---
title: "Set up OneSignal"
description: "Create Firebase, Apple, and OneSignal apps, then paste each App ID and REST API key into Ordering.co Push notifications."
canonical: https://docs.ordering.co/docs/products/dashboard/settings/pro/push-notifications/set-up-onesignal/
---
# Set up OneSignal
[Back to the main guide](https://docs.ordering.co/docs/products/dashboard/settings/pro/push-notifications/)
Configure push notifications for:
- **Customer App** (Marketplace or Franchise App)
- **Business App**
- **Driver App**
Saving IDs in the Dashboard does not send a notification. Delivery still requires a OneSignal app, a registered device that granted permission, and an event that triggers a request.
## Overview
Push notifications let the platform send alerts to users' devices, including when the app is not open.
They are commonly used to:
- Notify customers about **order status updates**
- Send **promotions and special offers**
- Inform users about **new products or services**
- Improve **customer engagement and retention**
Ordering.co manages these notifications through **OneSignal**, which handles communication with the device.
Once configured, notifications can be triggered by events such as:
- Order received
- Order accepted or rejected
- Order ready
- Order out for delivery
- Order completed
[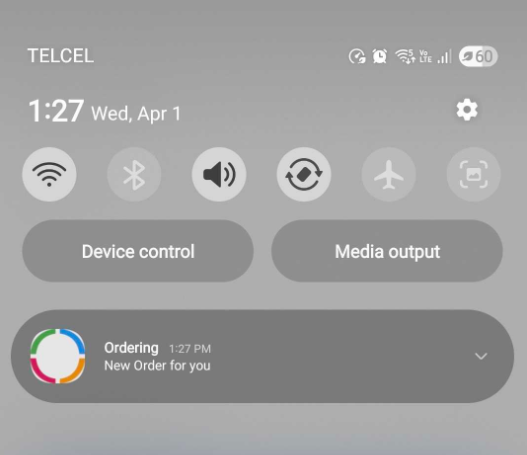](https://docs.ordering.co/assets/files/8c4b5a2a422fffde898d6c19-656e4785e92a10af039f492f4cbeaf02.png)
The event list above is what the integration is built to send. Checking a status on [Push notifications](https://docs.ordering.co/docs/products/dashboard/settings/pro/push-notifications/) still does not prove that OneSignal delivered that event to a device.
## How push notifications work
1. A user installs the mobile app.
2. The user **accepts push notification permissions**.
3. The device is registered with **OneSignal**.
4. When an event occurs (for example, an order-status update), the platform sends a notification request.
5. **OneSignal delivers the notification** to the user's device.
If the user declines permission, or the device never registers, later Dashboard saves do not create a delivery.
## Benefits
Push notifications help businesses:
- Provide order updates as events occur
- Increase customer engagement
- Encourage repeat orders
- Send targeted promotions
- Improve the overall customer experience
Those outcomes still depend on permission, a valid App ID and REST API key, and OneSignal accepting the request.
## Requirements
- A **OneSignal account** at
- A **Firebase project** for Android at
- An **Apple Developer account** for iOS push notifications
OneSignal and Firebase accounts are created in those providers' consoles. An Apple Developer account is a separate provider requirement.
## OneSignal Android configuration (Google)
### Part 1: Firebase
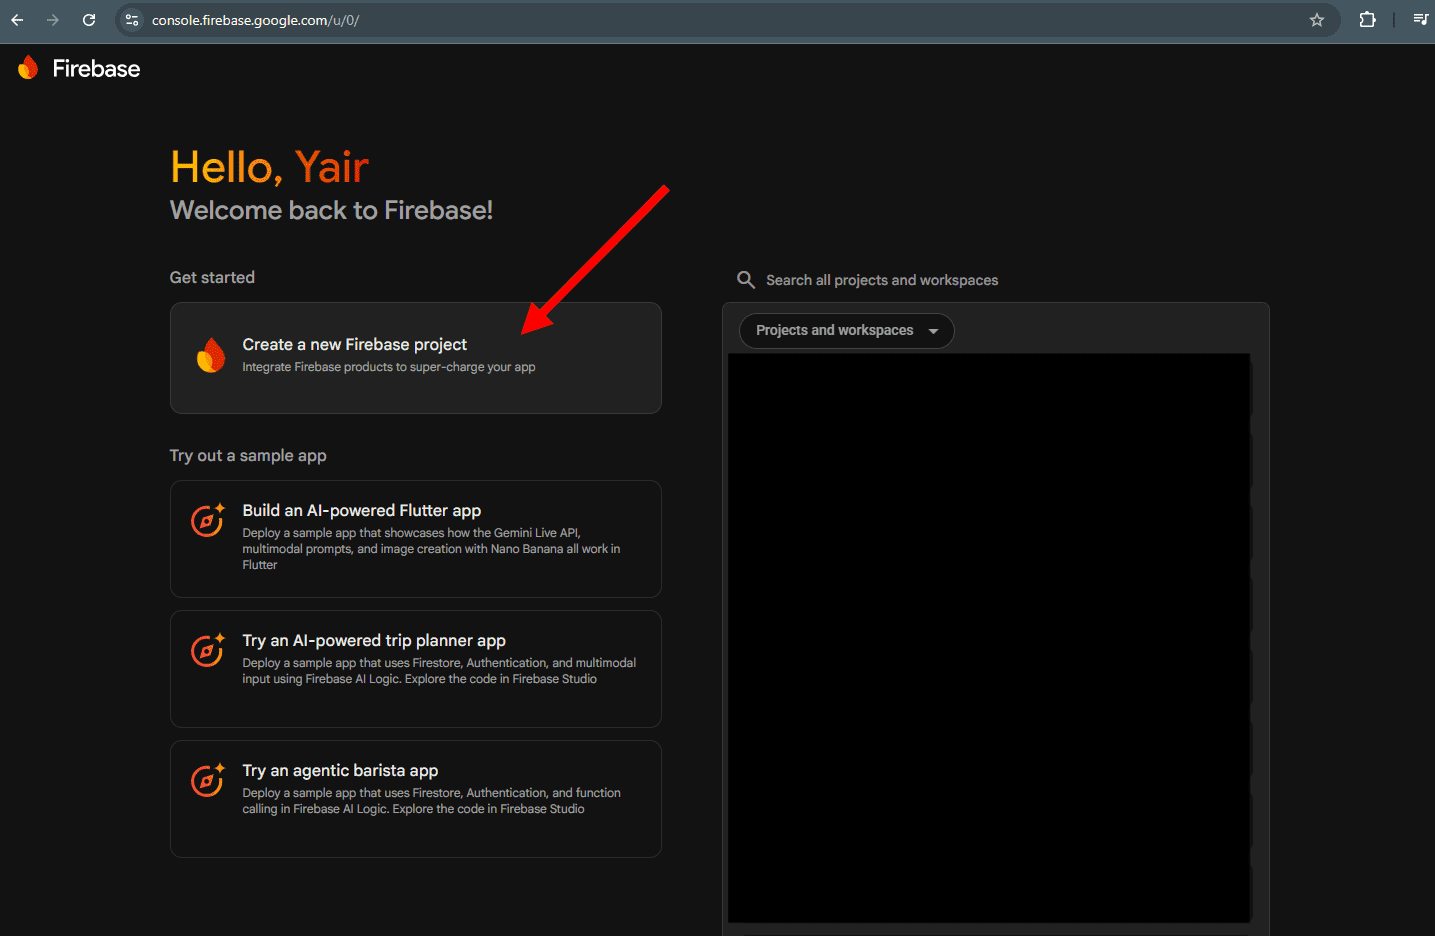
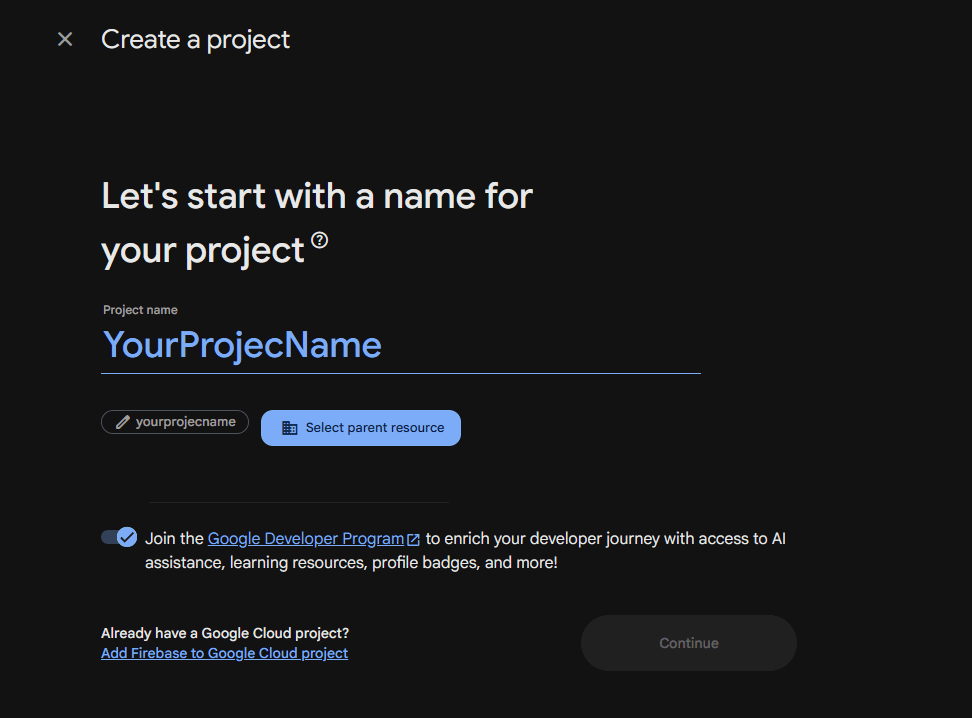
1. Log in to your Firebase account and create a new project. **One project is enough** for all of your apps.
[](https://docs.ordering.co/assets/files/65053d63927f868279f8ea7a-ccfc7c83b95a9bc7f9e0181625dc5b8d.png)
[](https://docs.ordering.co/assets/files/70c523b47619a8997b3d4627-b7a386d40bd4bf1faa97ee695dc64624.png)
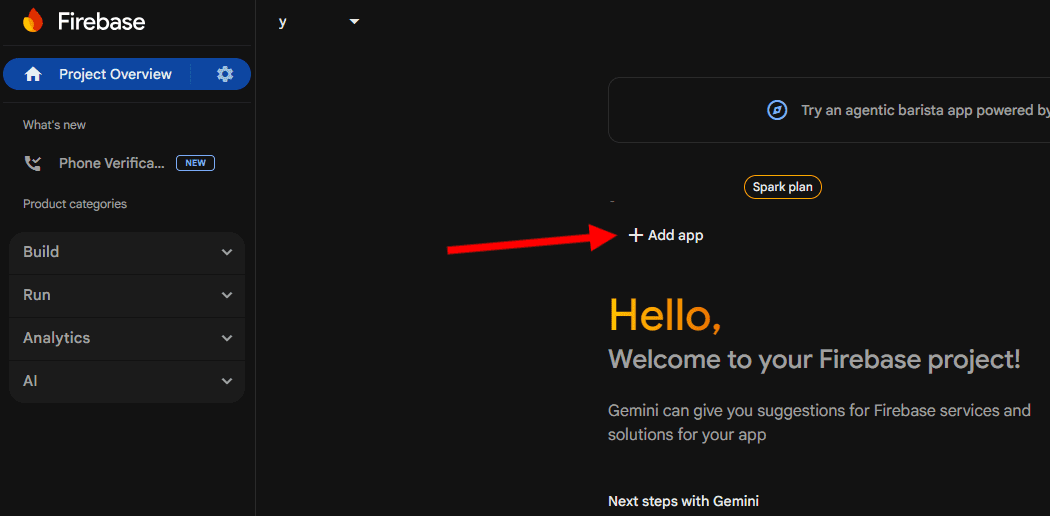
2. Register your Android app and enter your app identifier.
[](https://docs.ordering.co/assets/files/38d660b3d127e72a8711fa99-2639c3e11be2855857f841ed5d12d2c8.png)
[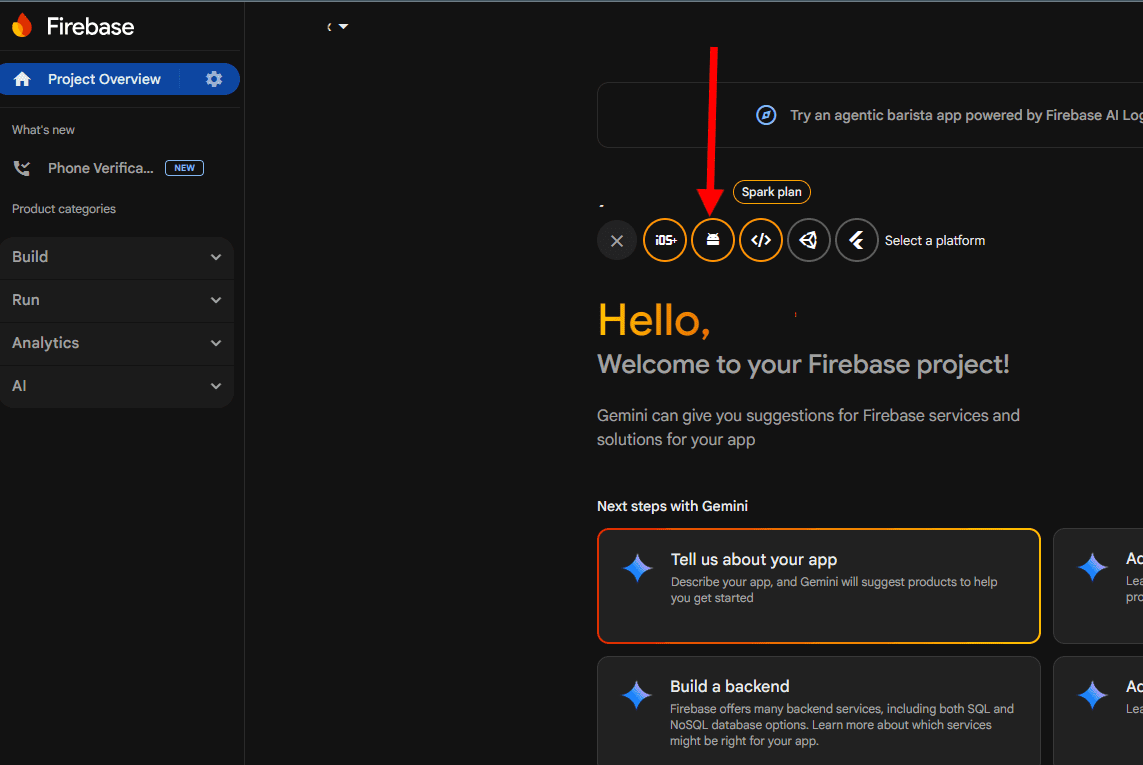](https://docs.ordering.co/assets/files/82ec7699f81b29082390e81d-9877060bb8641869dc9957e8ccd5ee51.png)
[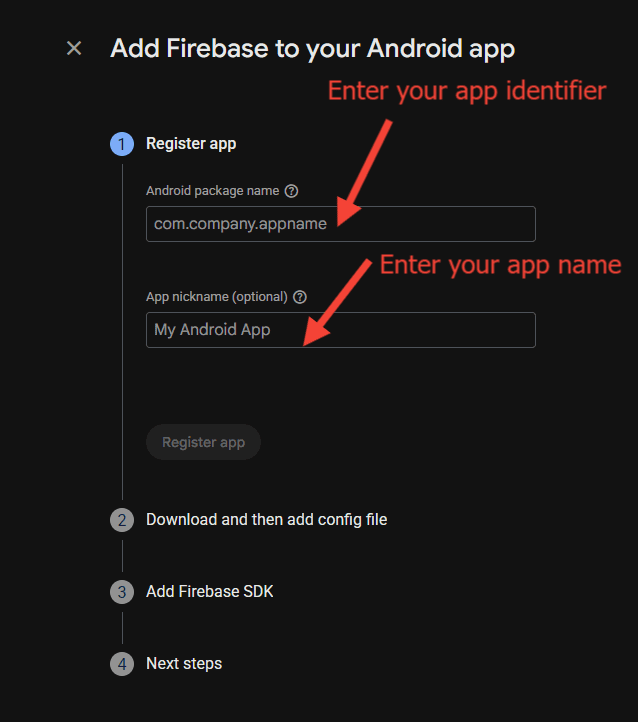](https://docs.ordering.co/assets/files/4ca42f69556c10baa6b7e080-669fe31e86c3812a8374e907ac39a4ee.png)
3. Open the settings of your registered app.
[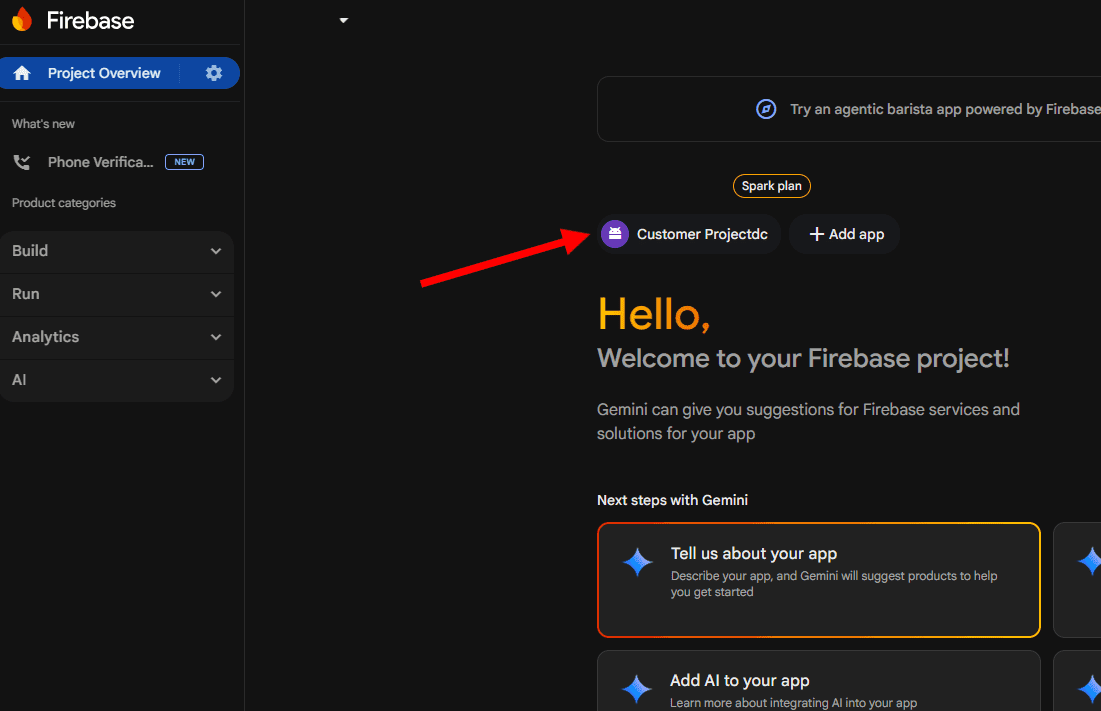](https://docs.ordering.co/assets/files/dddd90c0a587314eff3cacf8-84a46a233ac1d6c7bf806766adb3bf9b.png)
[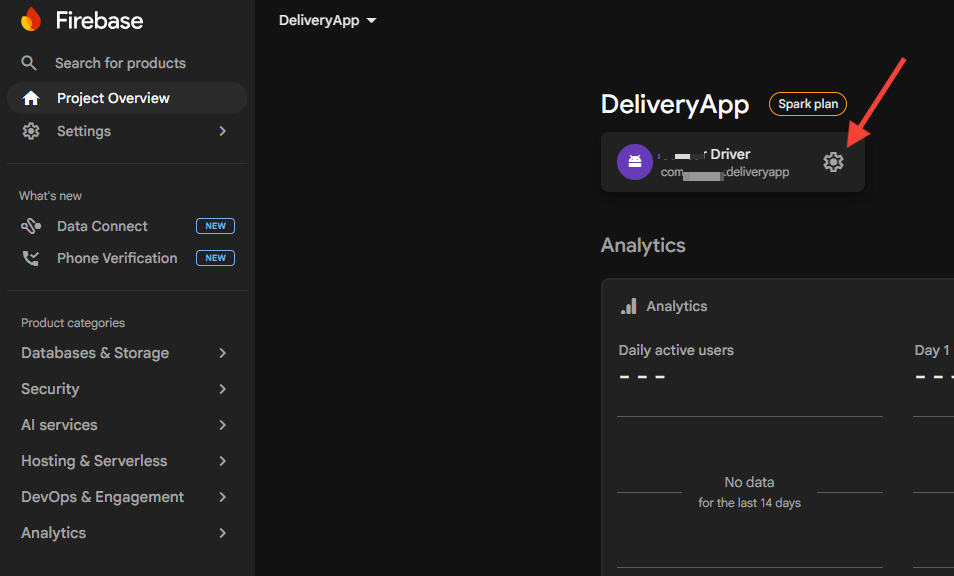](https://docs.ordering.co/assets/files/cf234f472d736a10d53142d2-202dba3b162ac1e943a1841e8facc036.png)
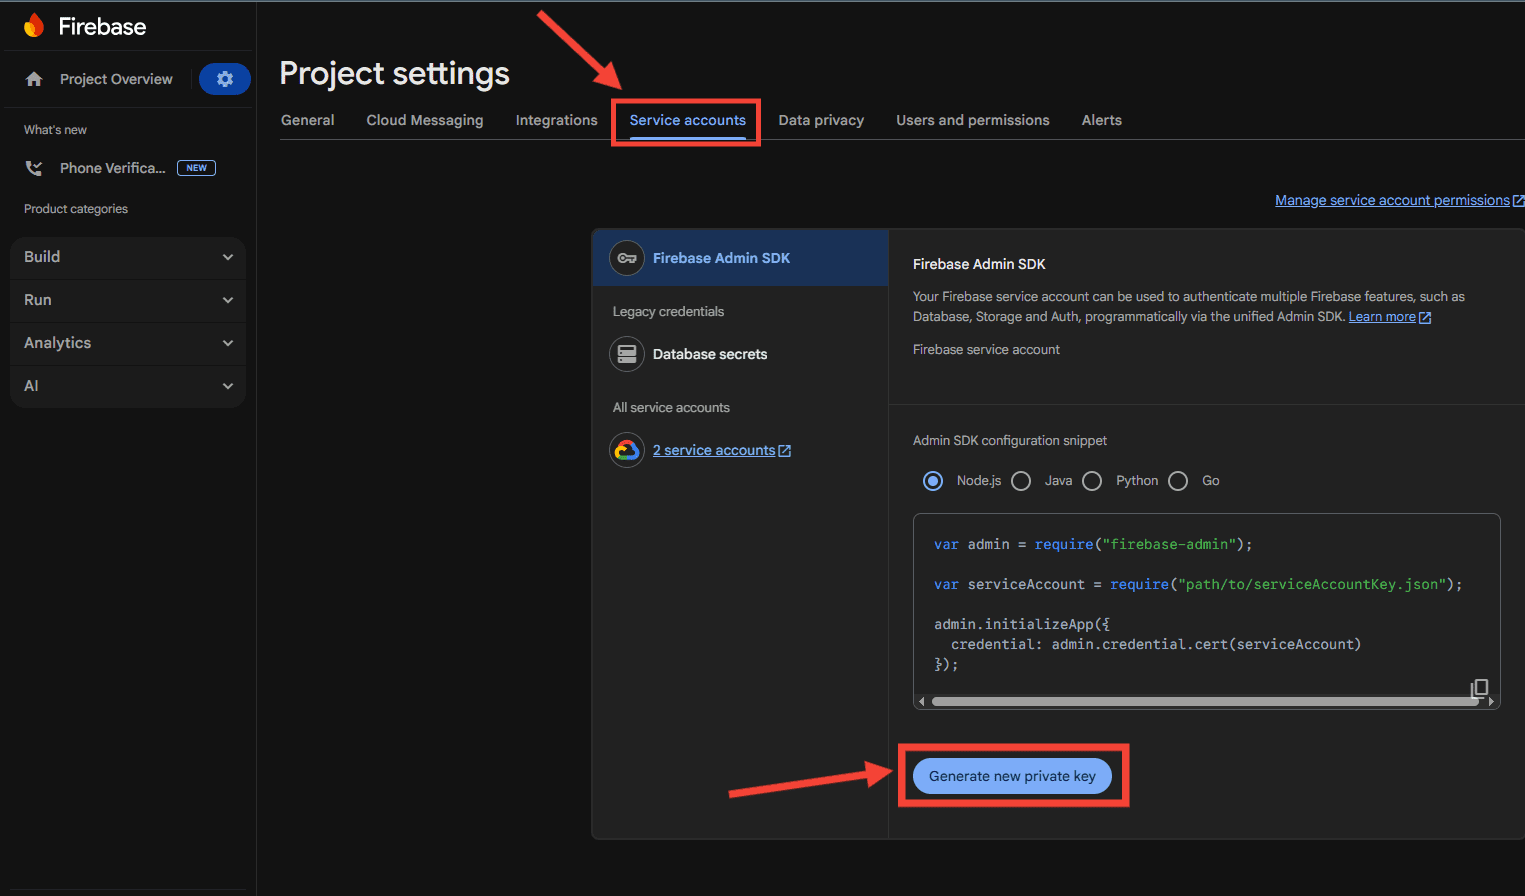
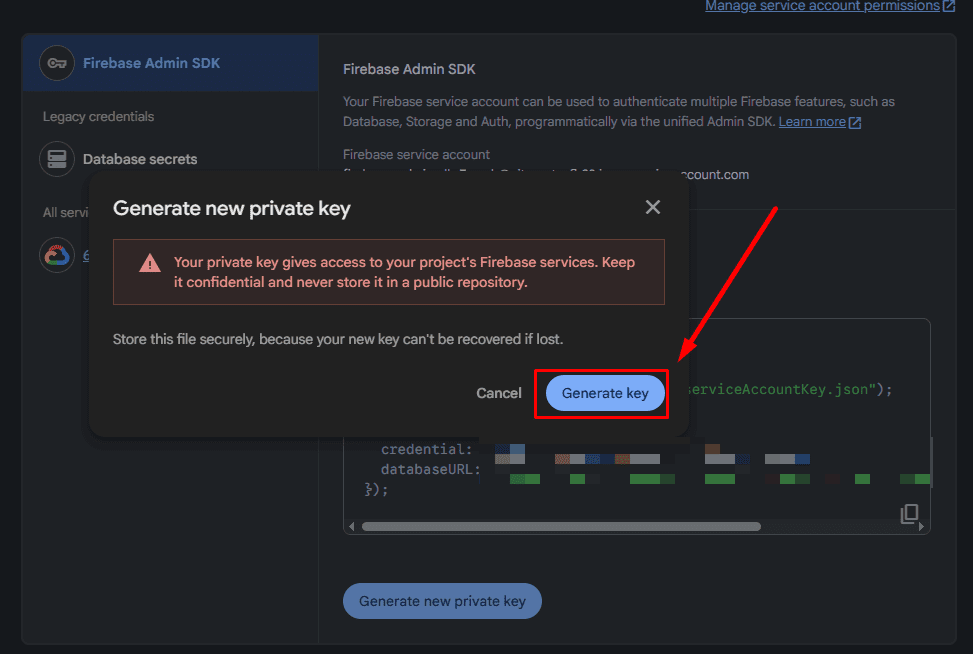
4. Generate your **Firebase Service Account** and save it. You will upload it to OneSignal later.
[](https://docs.ordering.co/assets/files/83c09a869f8fc7f191997bf2-b41f6eb2a6a08c8cda0fc42b3b4536ba.png)
[](https://docs.ordering.co/assets/files/d68b549928ed0e9e119824a9-3c48af4844b10c7383c141e590de4ea0.png)
Treat the JSON file as a credential. Do not paste it into tickets or chat.
### Part 2: OneSignal
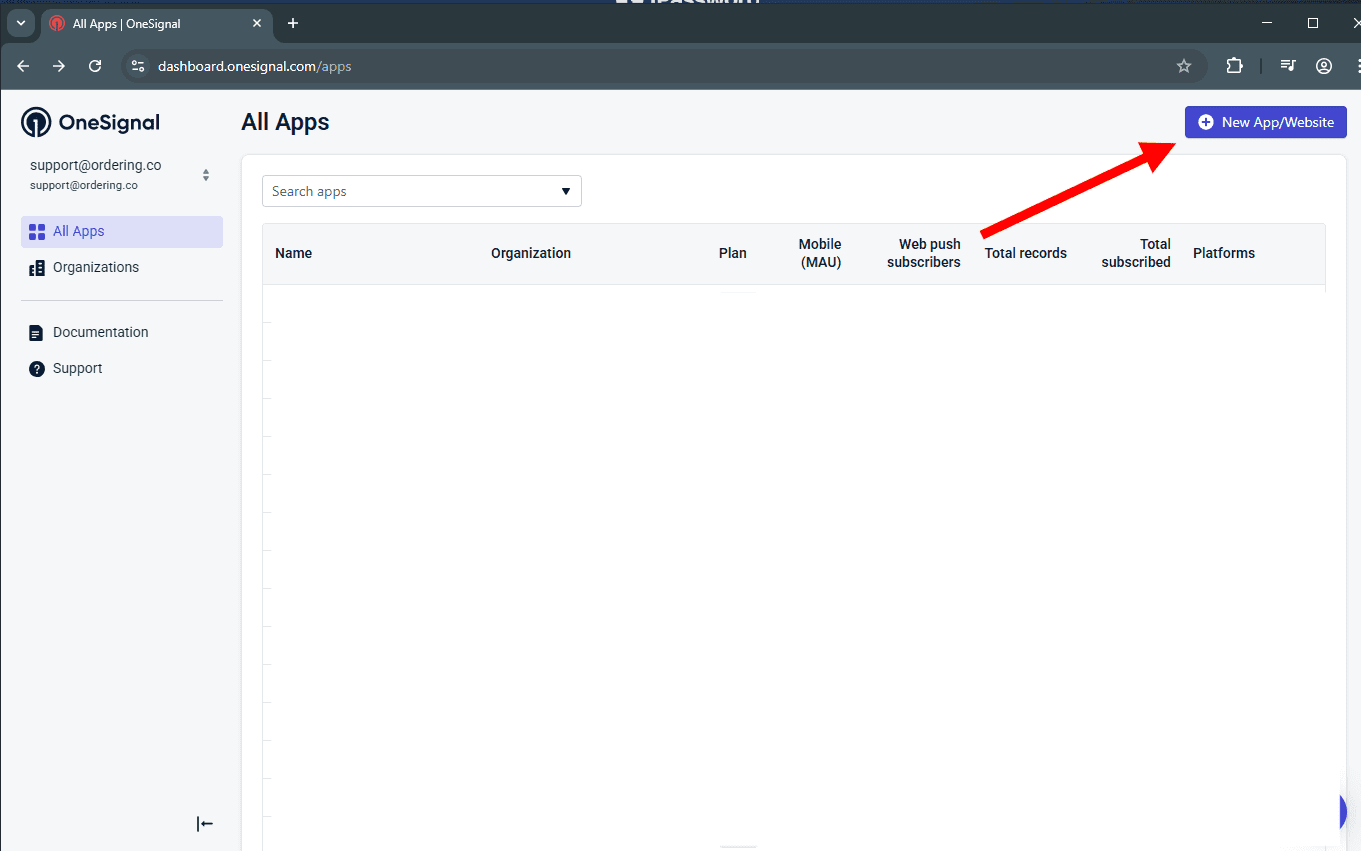
1. Log in to your OneSignal account and create a new app configuration.
[](https://docs.ordering.co/assets/files/13fda9f76027f96e19befc15-7c0cdfaa1d62981cbc6e2e1227e4aa52.png)
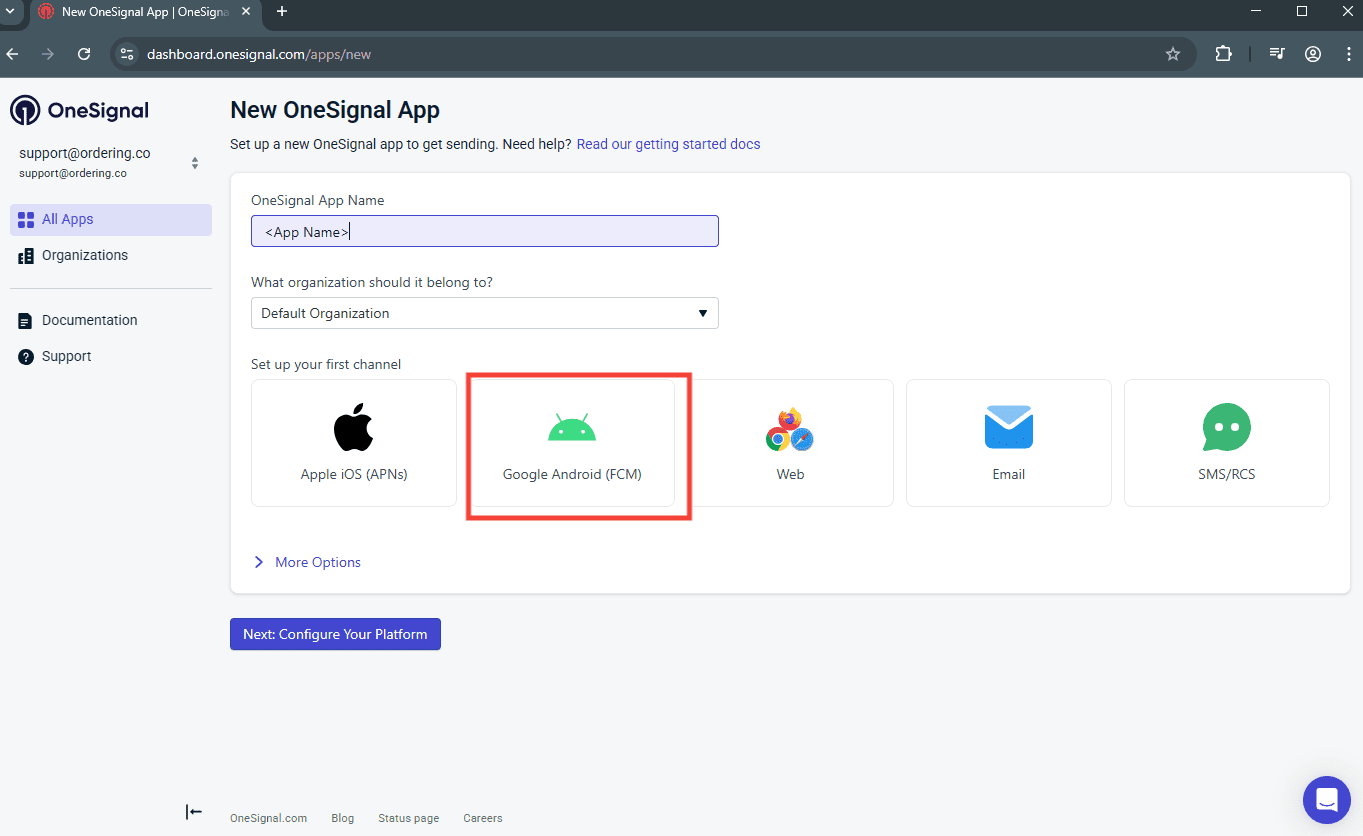
2. Enter your app name and select **Google Android (FCM)**.
If the app setup already exists, go to **Settings** → **Push** in that app.
[](https://docs.ordering.co/assets/files/3c5a23fd97f5c7cb98316fc2-0b1e6266dba8492b72bdd604c631ae53.png)
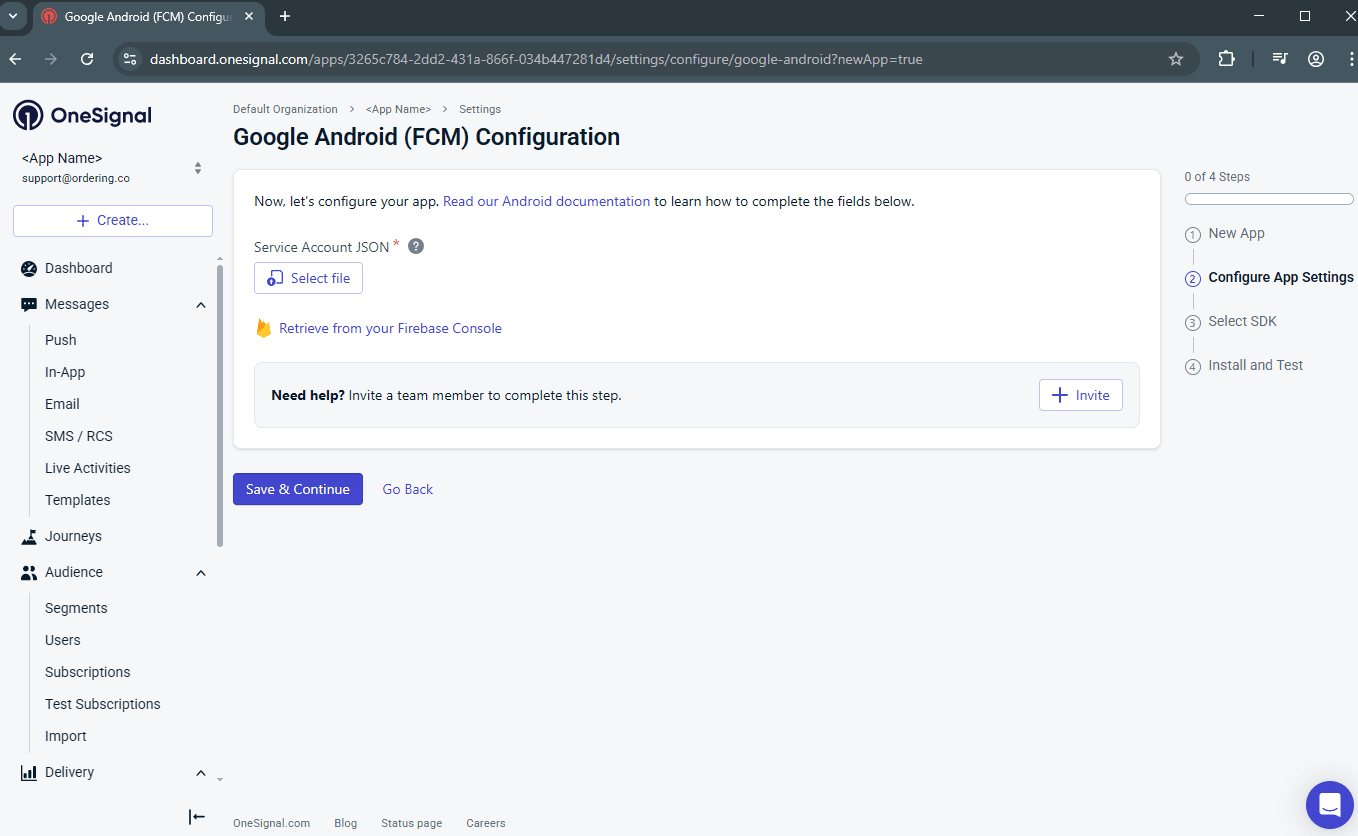
3. Upload the **Service Account JSON** you downloaded from Firebase.
[](https://docs.ordering.co/assets/files/bcd1a9d1a658192b57f695f3-47e6604bec12a5dc01d042948adf8982.png)
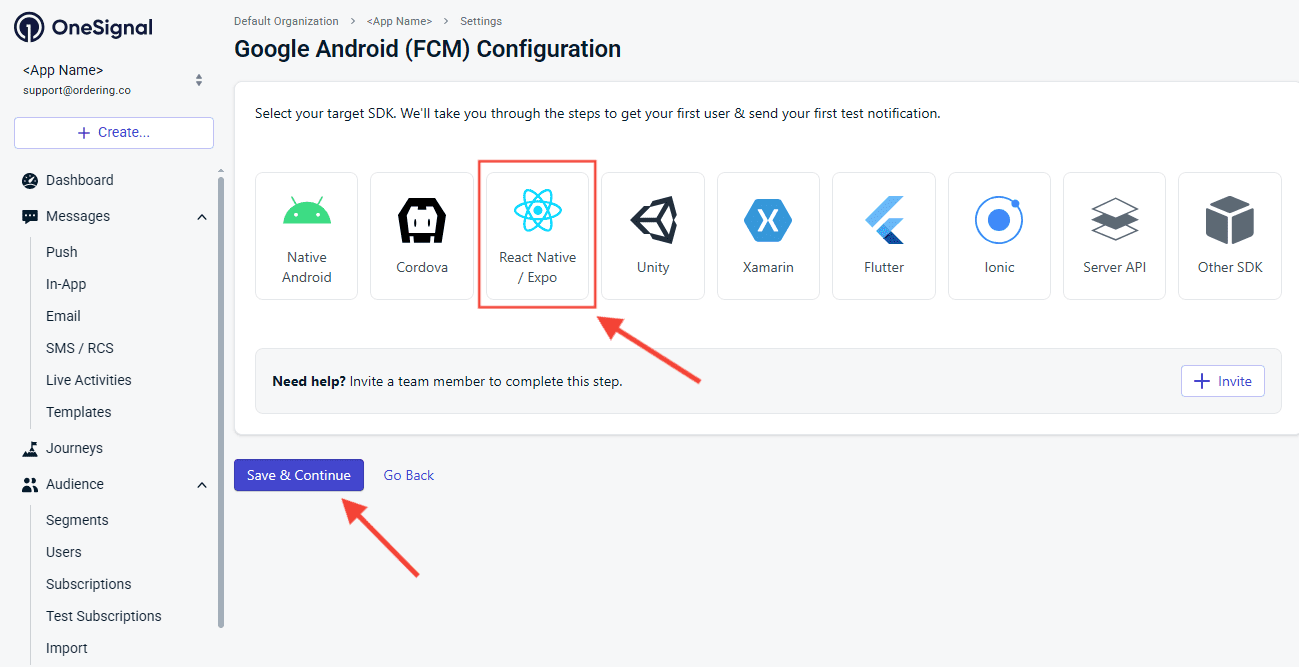
4. Select your target SDK as **React Native**.
[](https://docs.ordering.co/assets/files/f5ebeb86ca22089ad123fa5f-1546c99ca5cca88426cc9daf53f46843.png)
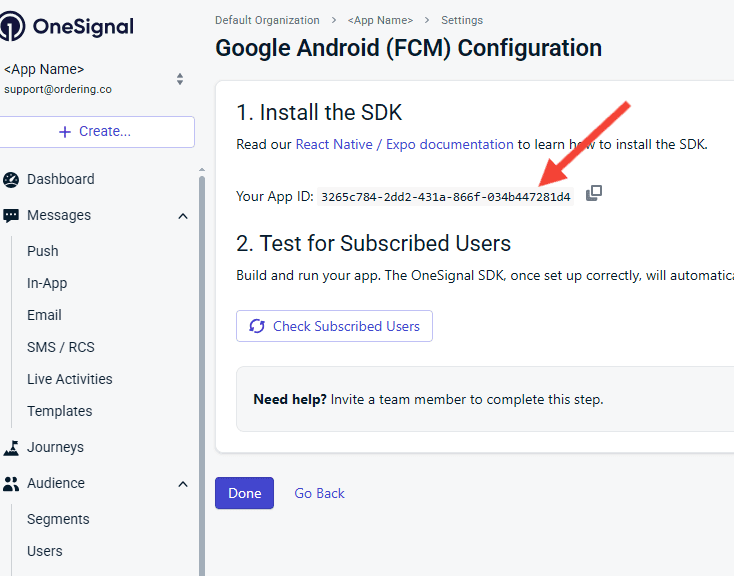
5. Copy and save your **App ID**.
[](https://docs.ordering.co/assets/files/9f91754a596a548b75ce9897-6fd83f308f449449abd20eeac95efef3.png)
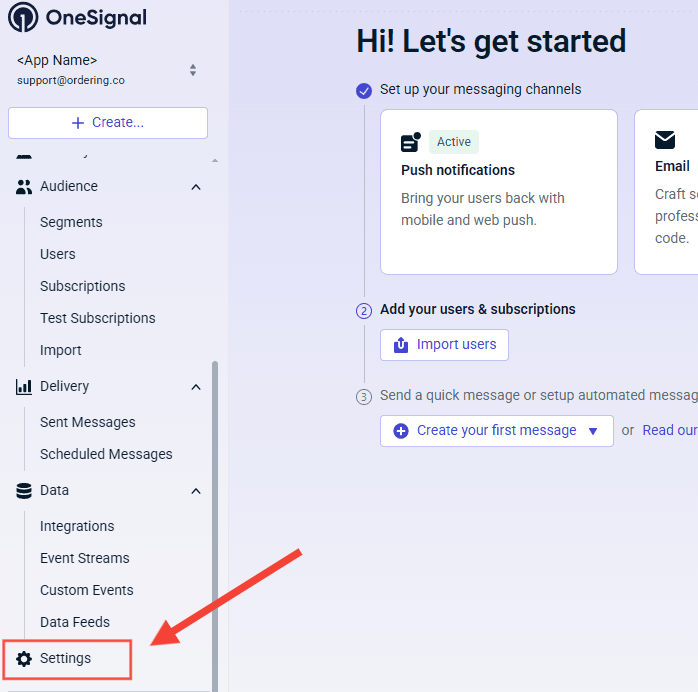
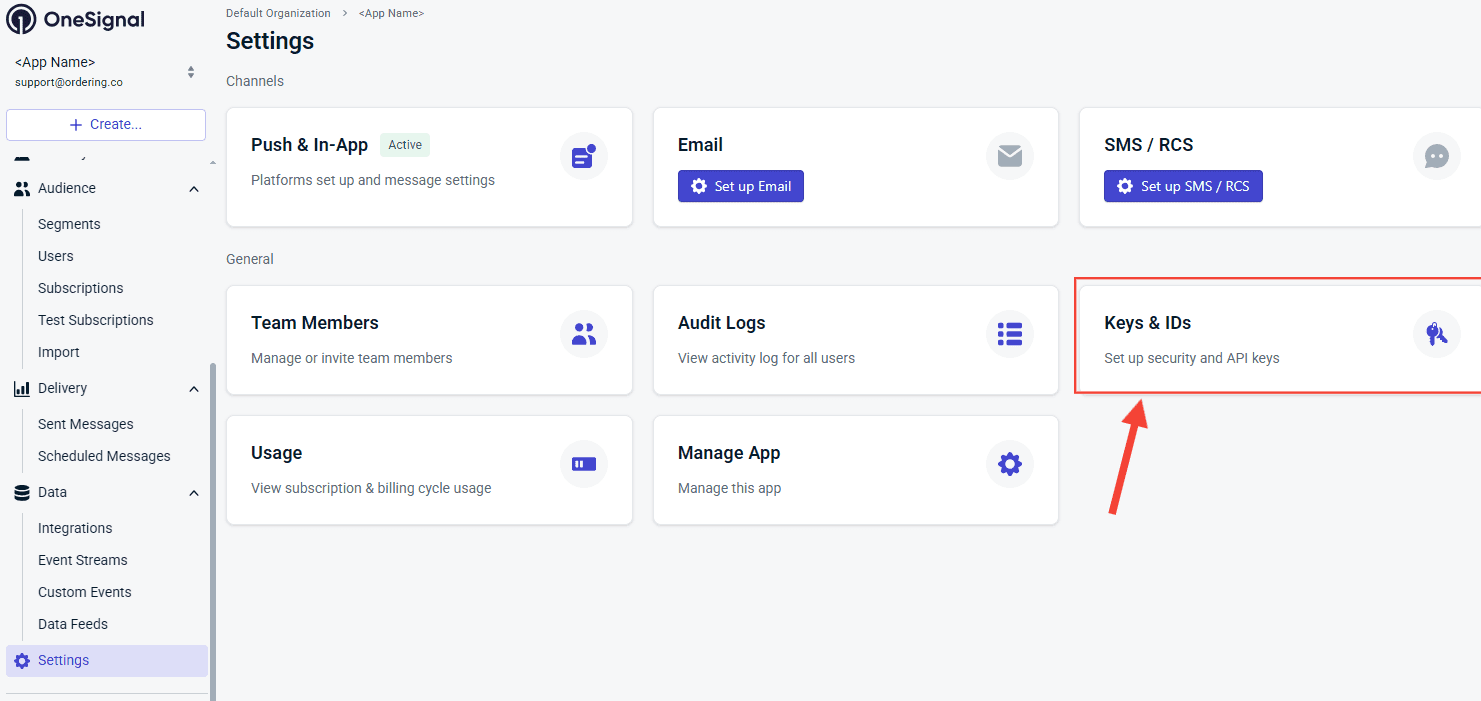
6. Go to **Settings** in your OneSignal setup and select **Keys and IDs**.
[](https://docs.ordering.co/assets/files/234be1729e2c8c486ffb0717-6600cd1cd52b23c823afa18f91a5e7a1.png)
[](https://docs.ordering.co/assets/files/e5356811c17b45194c671230-c9aa6ce9e30ba751778a19a54b0c39c7.png)
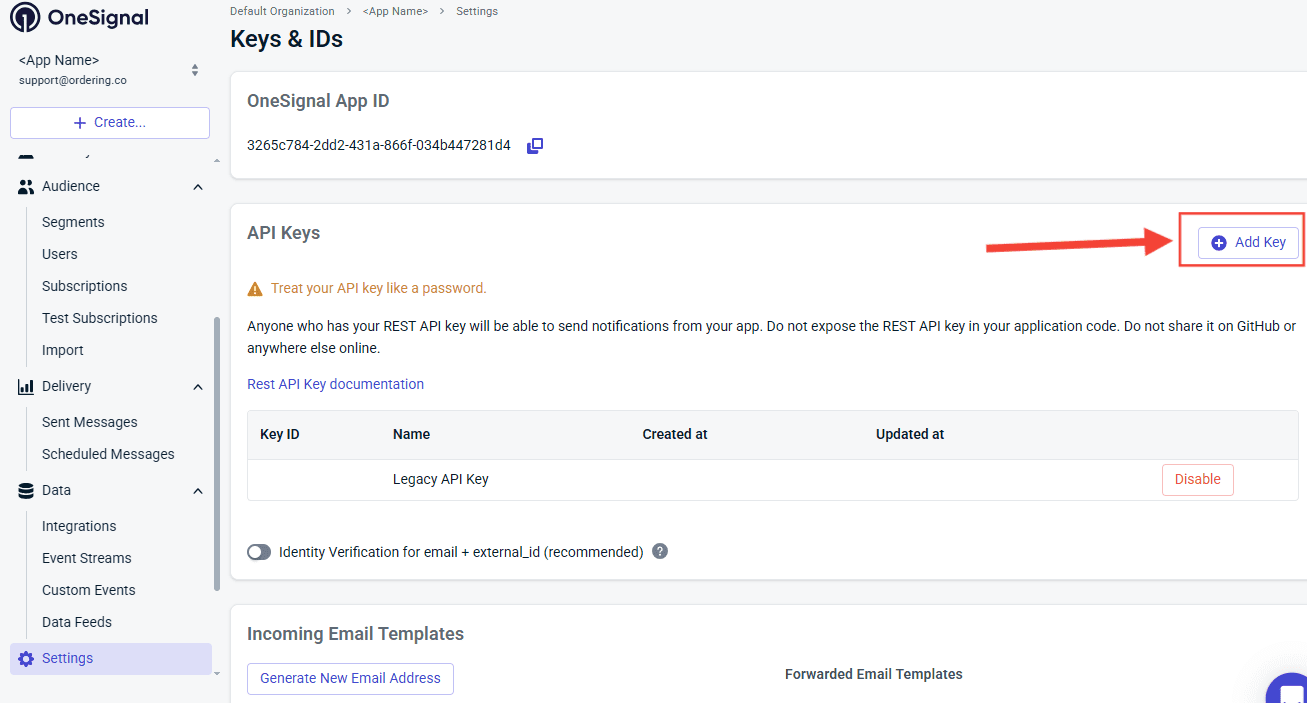
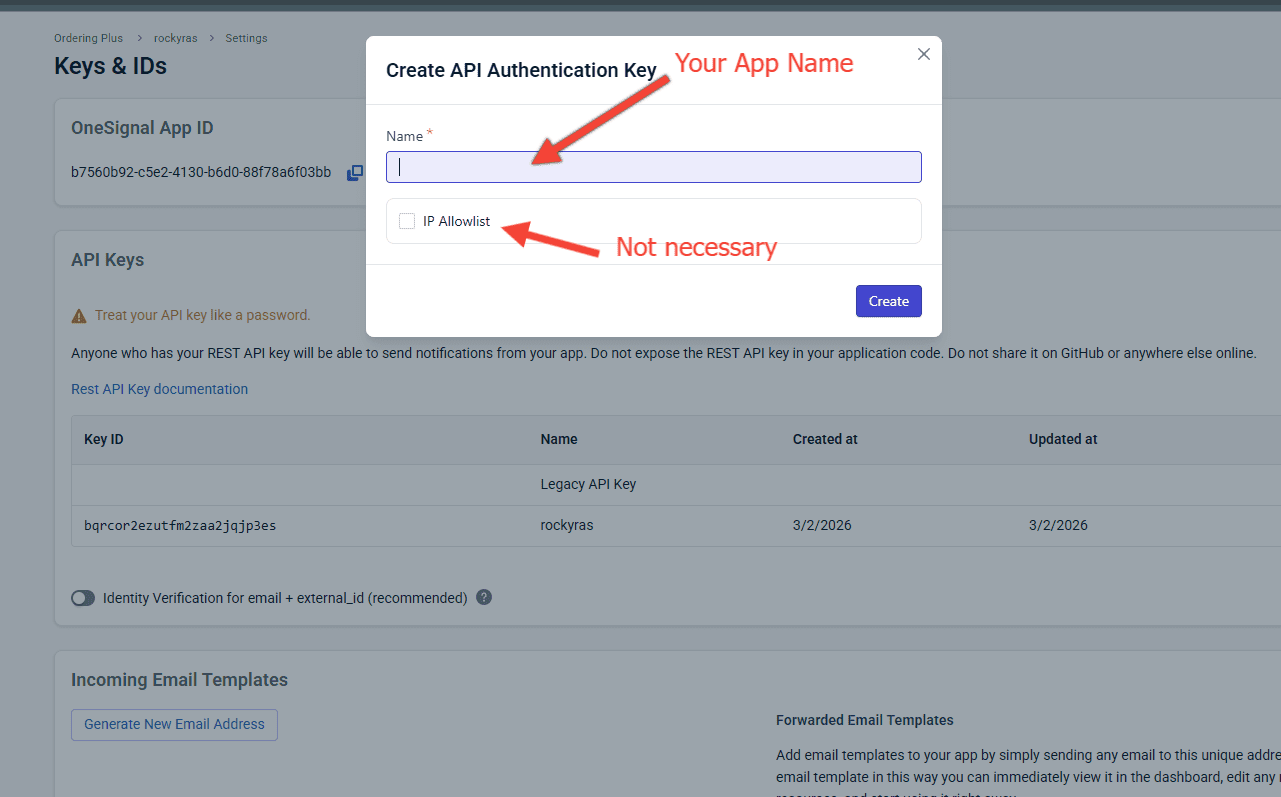
7. Create an **API Key**, copy it, and save it securely. OneSignal can show this value only once.
[](https://docs.ordering.co/assets/files/593645585287a9faf9fedd7d-841257c8c9bda403fb7bfc3d47dd1b62.png)
[](https://docs.ordering.co/assets/files/f52323187ec0507072f33a69-c9a50d8e7a1a92bc0df63beb22a41e0a.png)
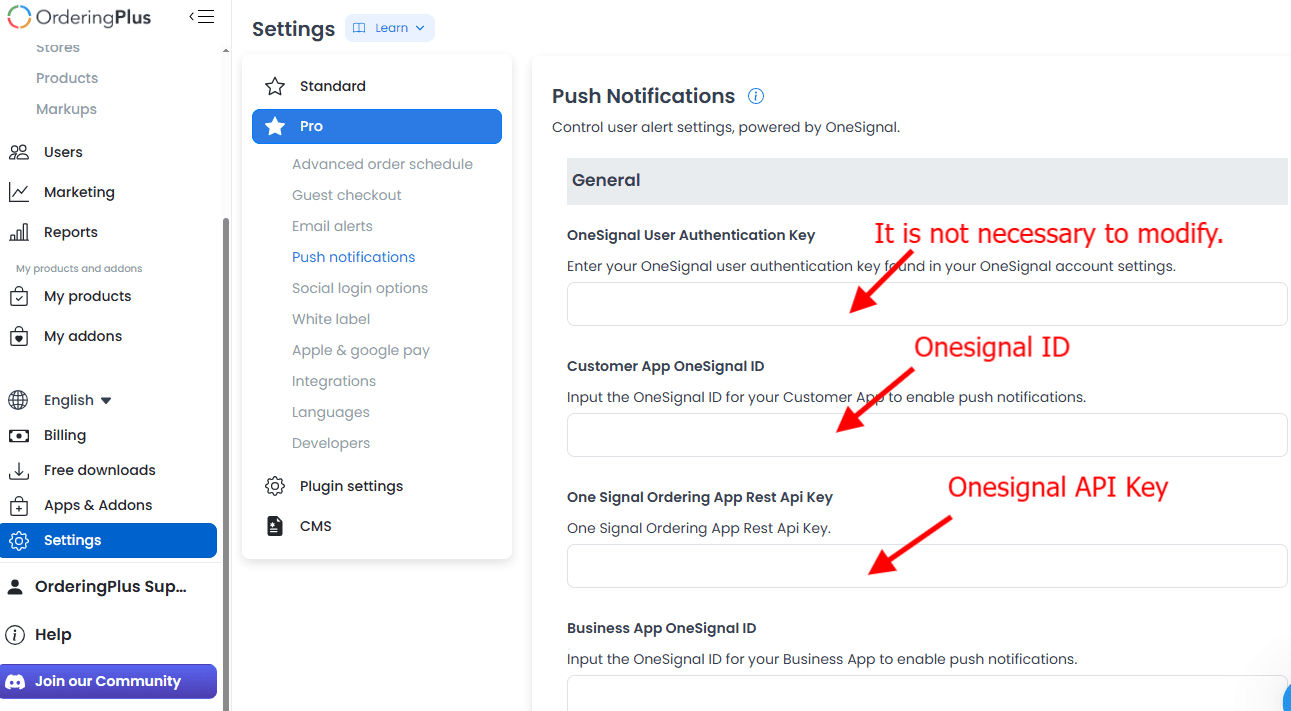
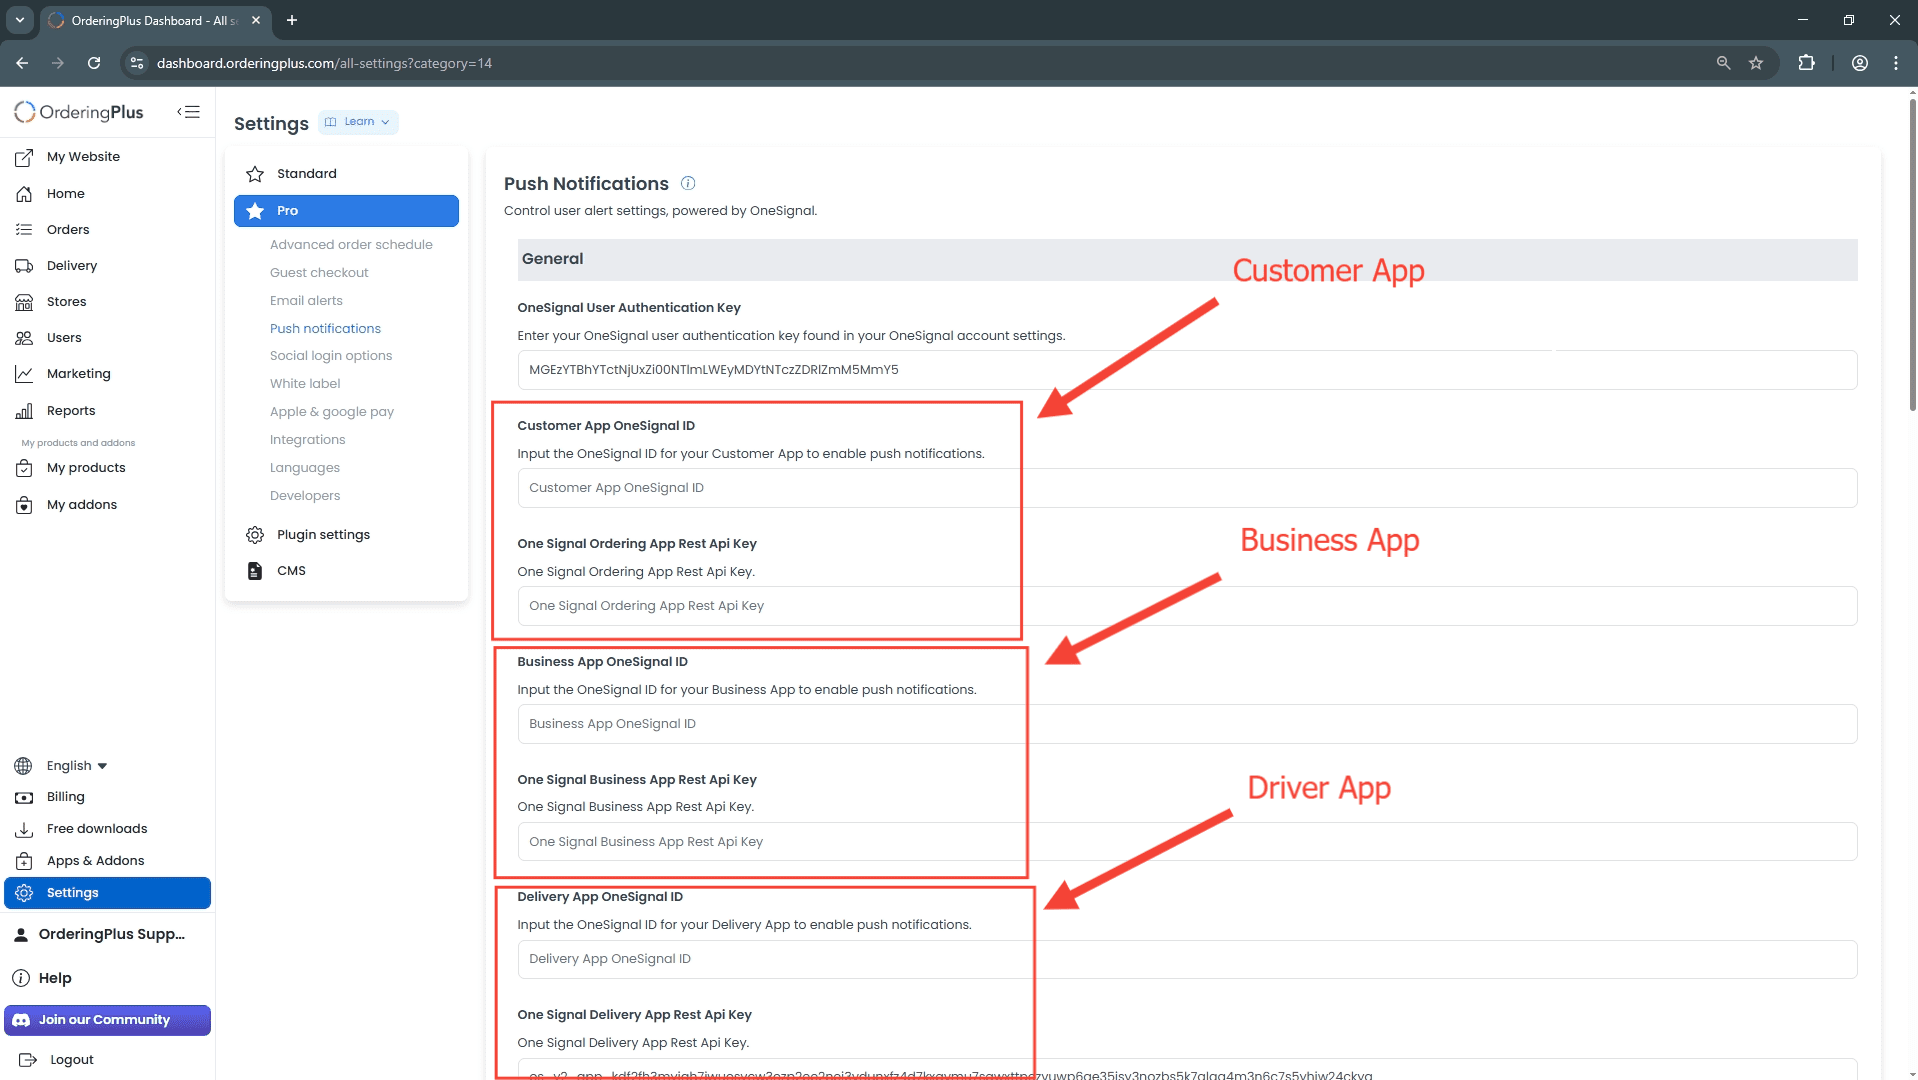
8. In the Ordering.co Dashboard, open **Settings → Emails & notifications → Push notifications → General**. Under **OneSignal apps**, enter the **App ID** and **REST API key** for the matching app, then select **Save changes**.
[](https://docs.ordering.co/assets/files/4bbf0dbbb51687ec30199dc6-50cec6dc2ec17d04fbc0eb7c0993a716.png)
[](https://docs.ordering.co/assets/files/86d2013c8996303a787853ed-d5b643977f84ba16e443ab4c420f6e64.png)
Set **One Signal Default Enabled** to **No** on that page so these custom credentials are used. See [Push notifications](https://docs.ordering.co/docs/products/dashboard/settings/pro/push-notifications/).
### OneSignal: Keys and IDs
OneSignal documents key types in [Keys and IDs](https://documentation.onesignal.com/docs/en/keys-and-ids).
Repeat the app registration steps in Firebase and OneSignal for **each** application so you generate the corresponding keys for each app.
After you save the matching IDs and keys, you can test on a device. Saving is not a delivery.
## OneSignal iOS configuration (Apple)
Create the OneSignal account before you start.
### Part 1: Apple Developer
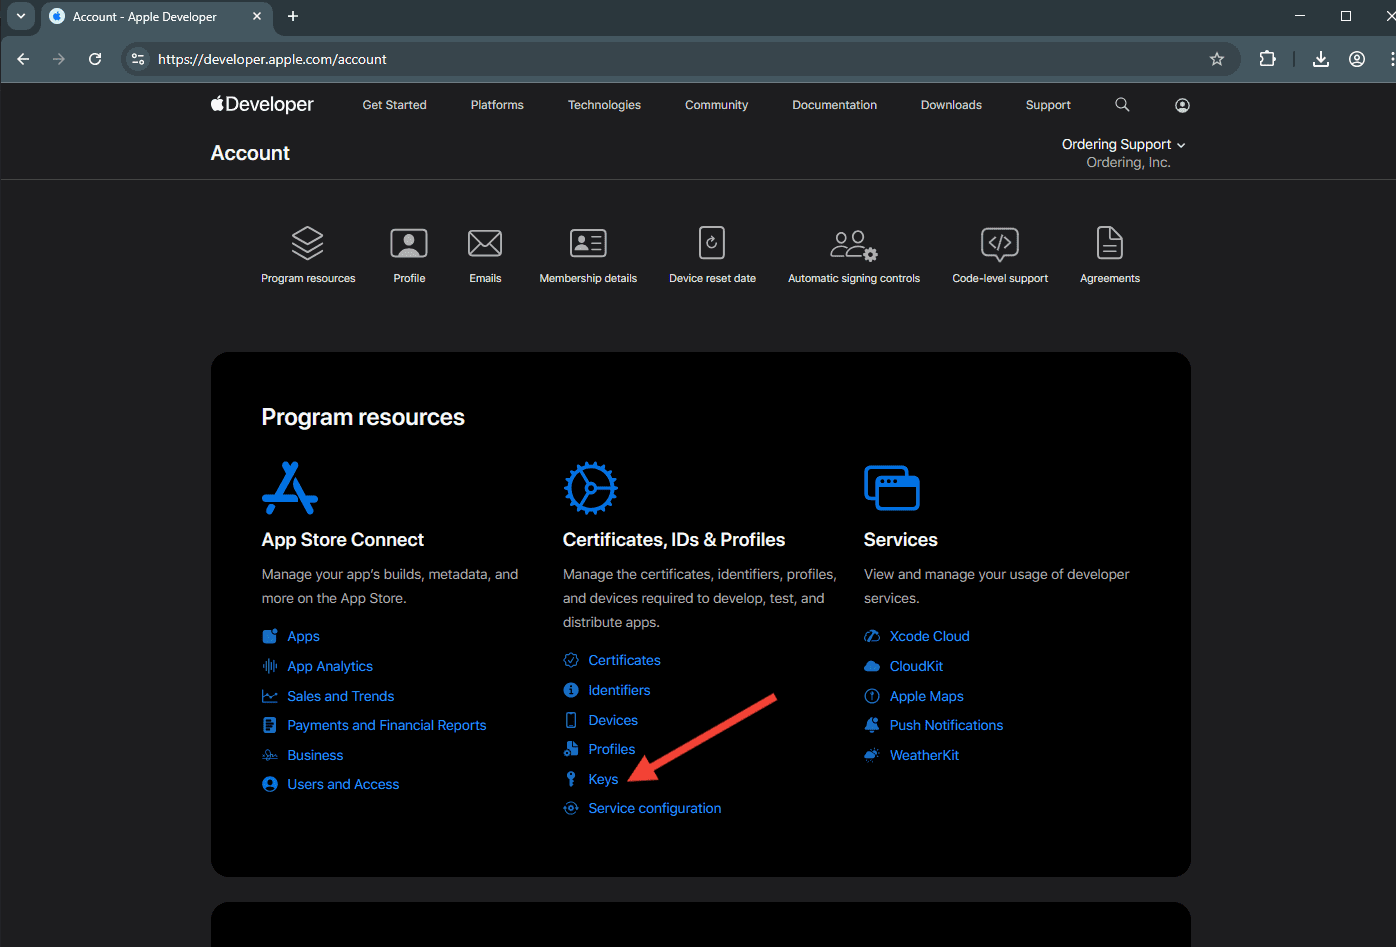
1. Sign in to your **Apple Developer** account at [https://developer.apple.com](https://developer.apple.com/).
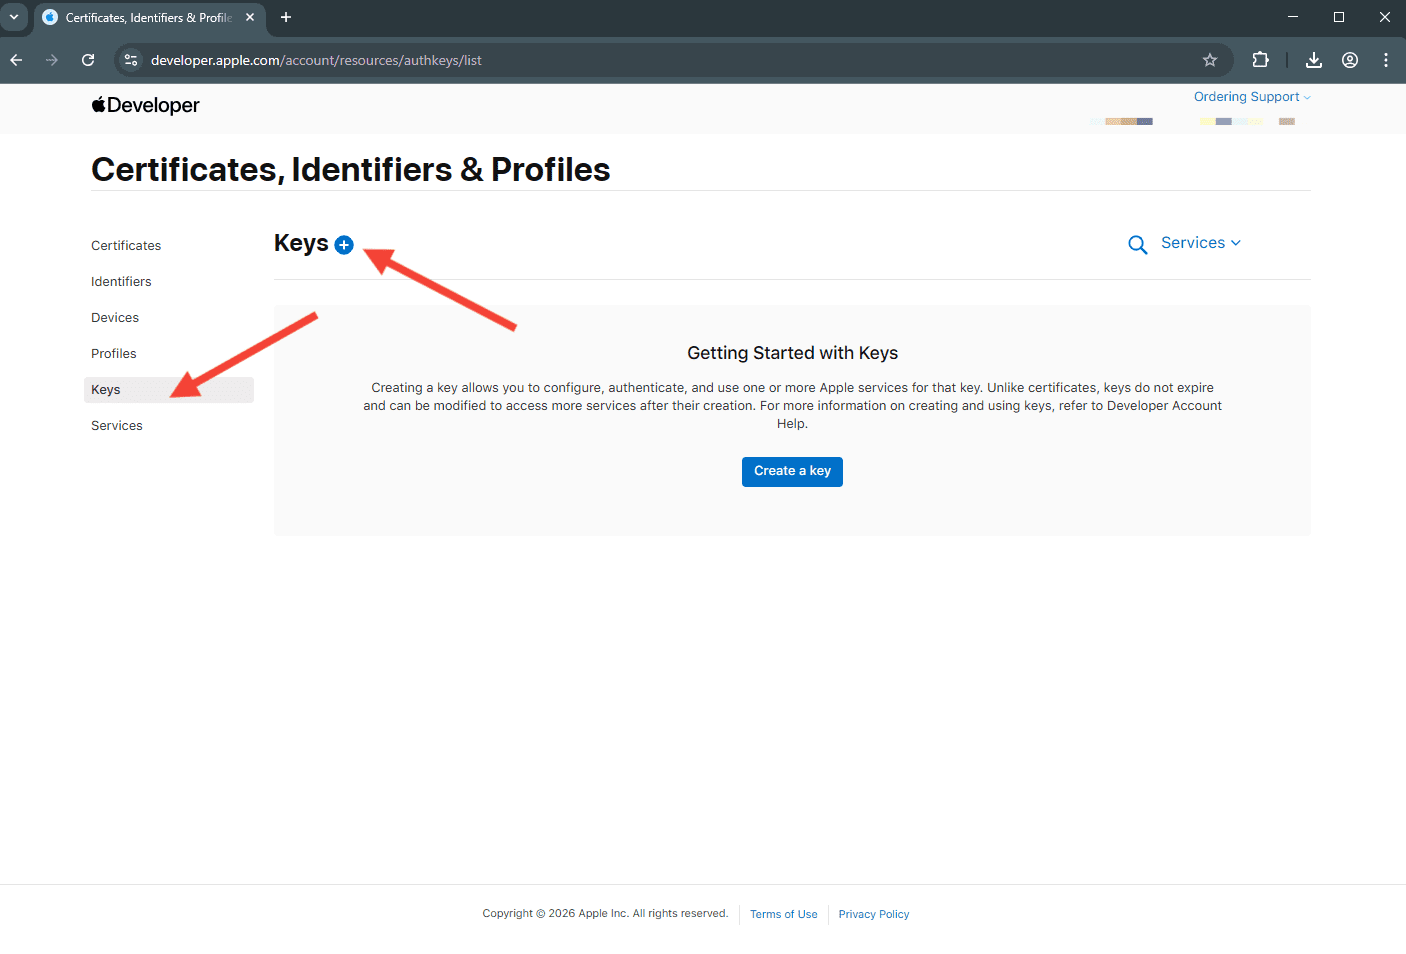
Go to **Keys** and select **Add New Key**. Direct list: .
[](https://docs.ordering.co/assets/files/36d9f3fa2569202b738700b1-16d71d72247032808edfd64988bc6fe0.png)
[](https://docs.ordering.co/assets/files/67d615c0b182bb9cfd7c7dc4-df59b038939f05296ce45213eb719b39.png)
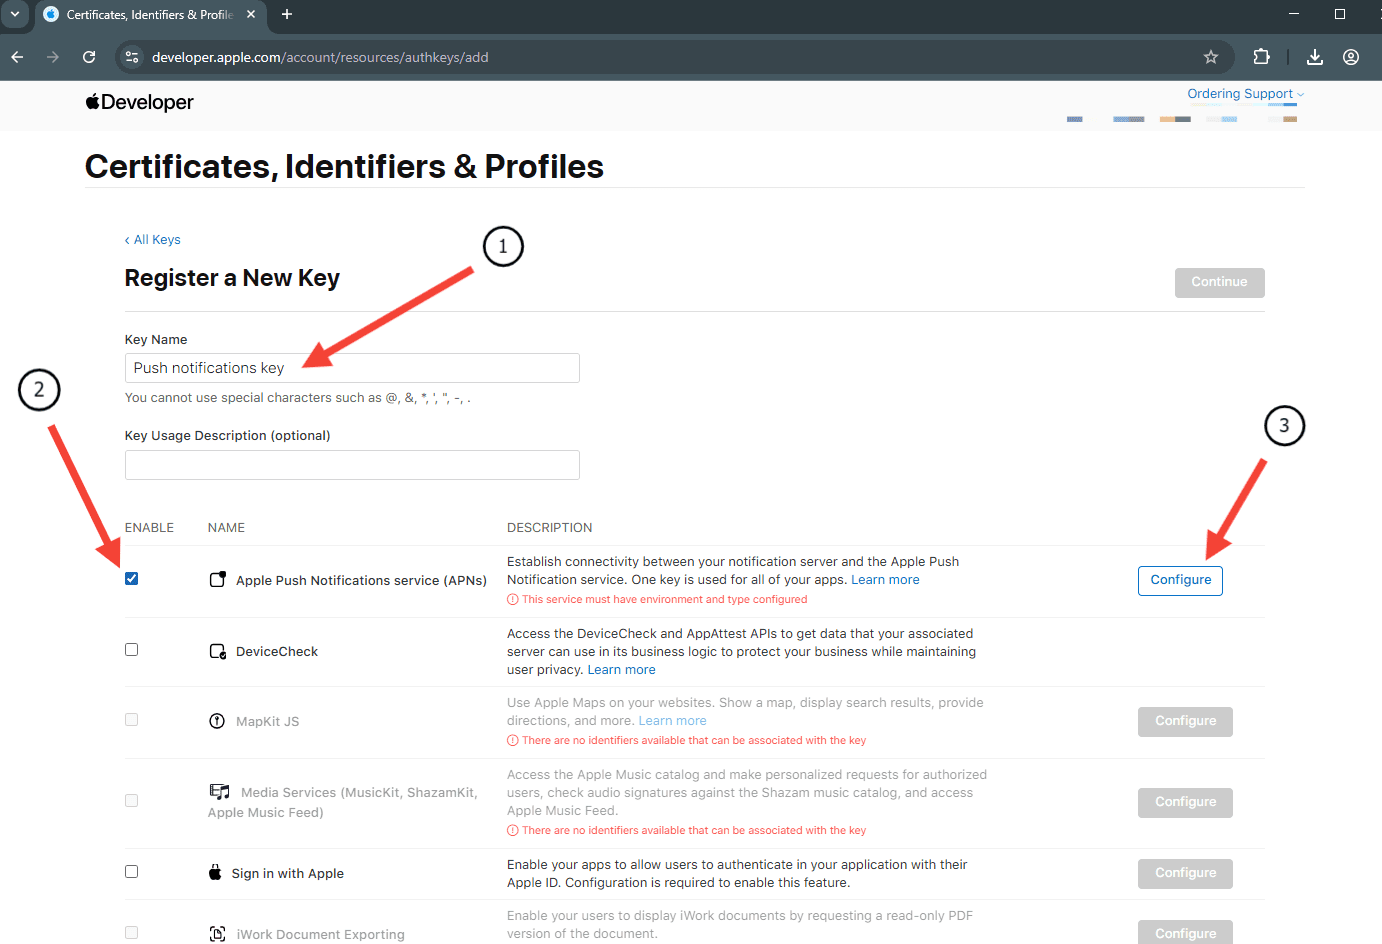
2. Enter a name for your key, select **Apple Push Notifications service (APNs)**, and select **Configure**.
[](https://docs.ordering.co/assets/files/16e96c3d39aad704445965d4-bdd138a69bc5bddf044e127a4073a626.png)
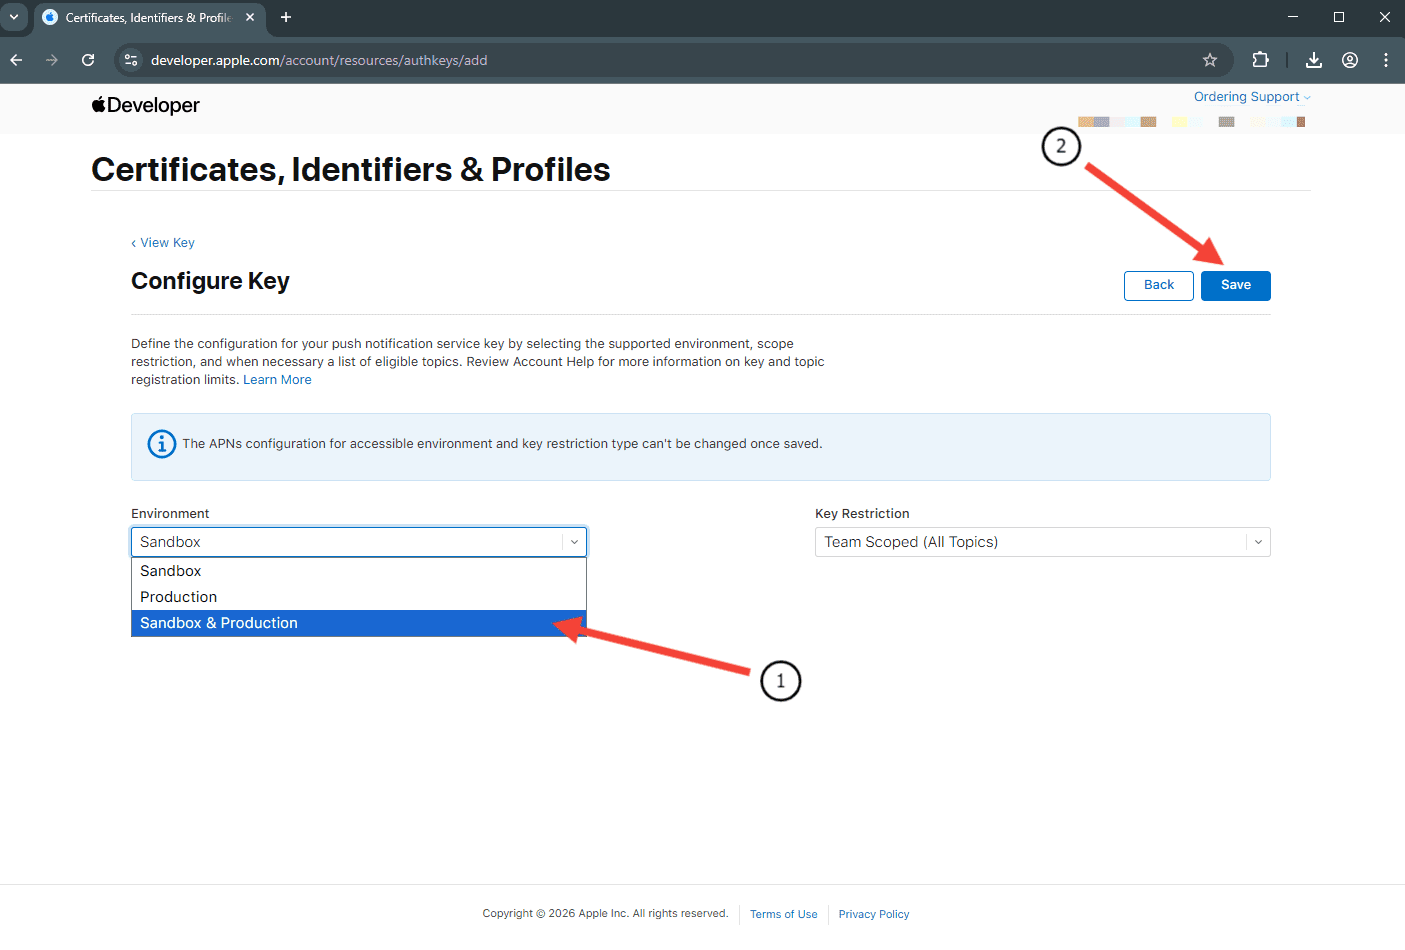
3. Select **Sandbox and Production** in **Environment** and select **Save**.
[](https://docs.ordering.co/assets/files/6c702c571da2beea186d1912-a914902497000a1da4a16473fd47b100.png)
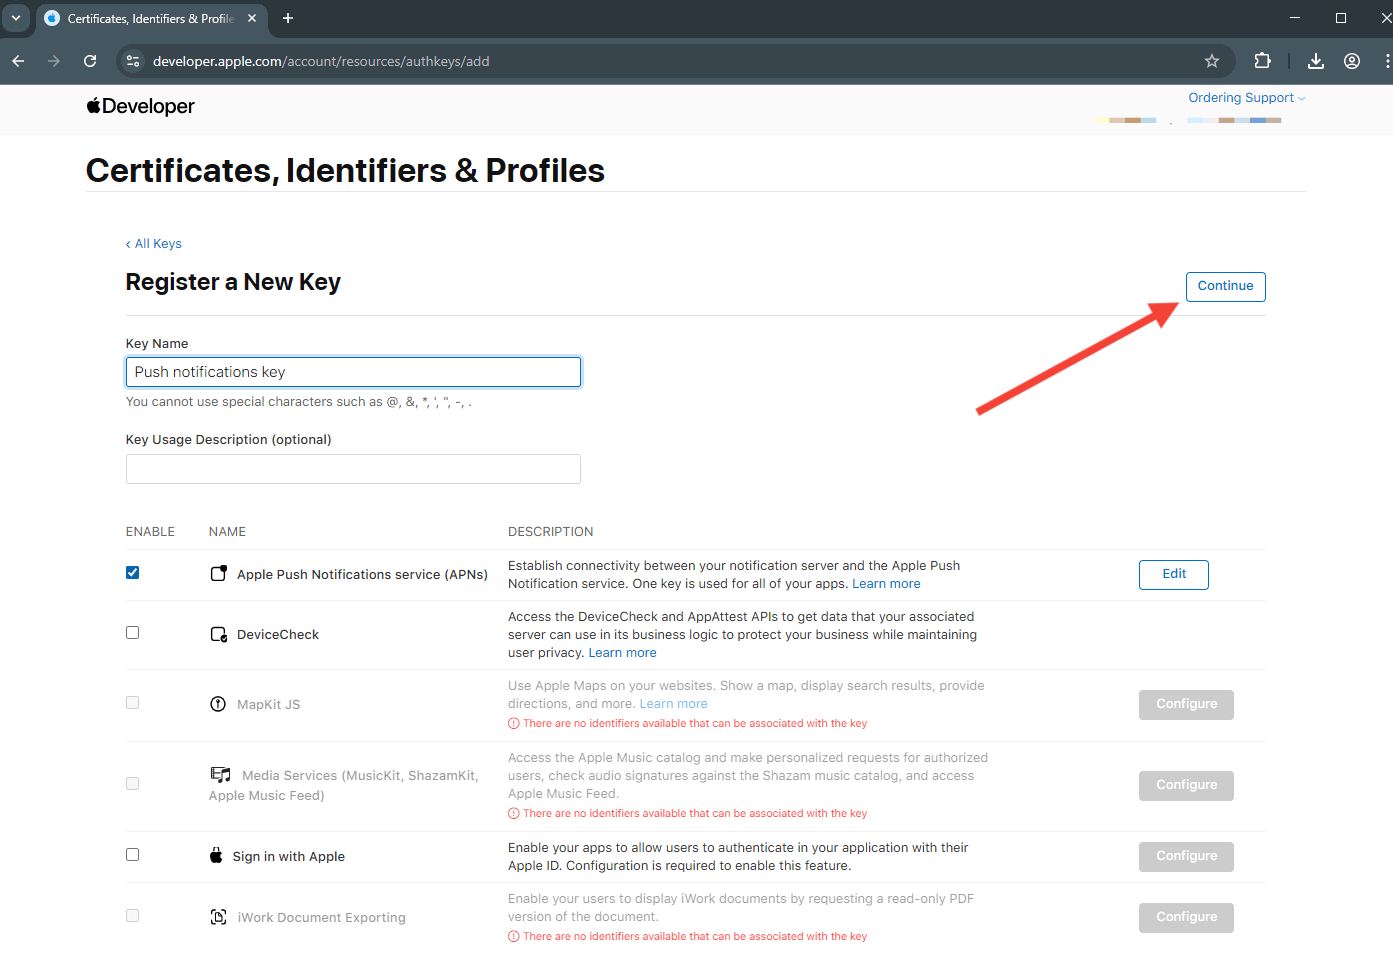
4. Select **Continue**.
[](https://docs.ordering.co/assets/files/5d7a14aec129f1bfeaa480ed-50e0acedb8bde43f6afdc7b0775f3dac.png)
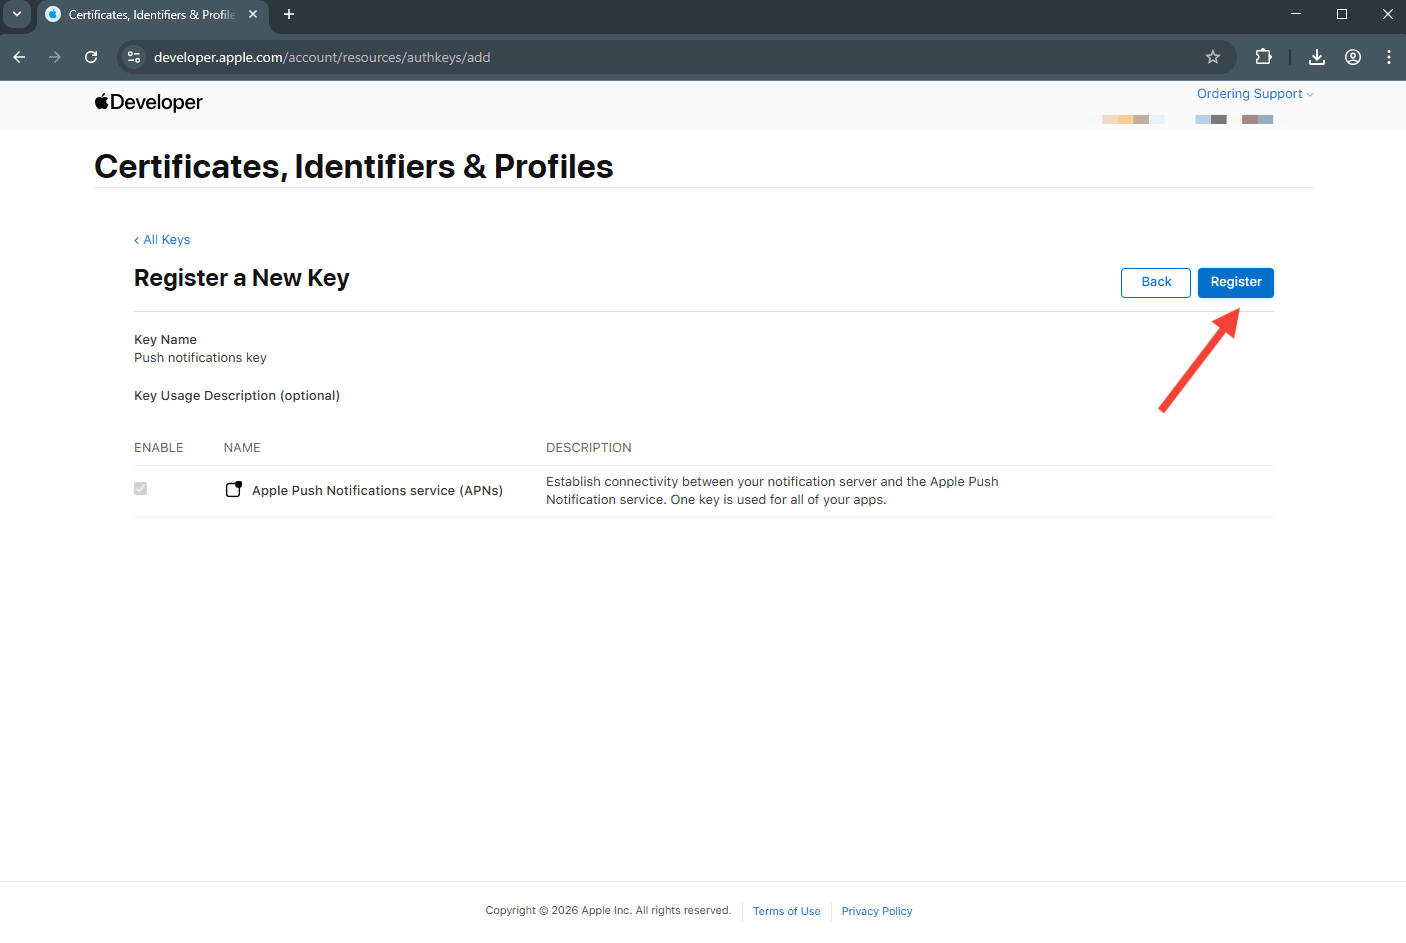
5. Select **Register**.
[](https://docs.ordering.co/assets/files/beda13a2652f48015922d5aa-b8f717af961322ece56d03be613979ea.png)
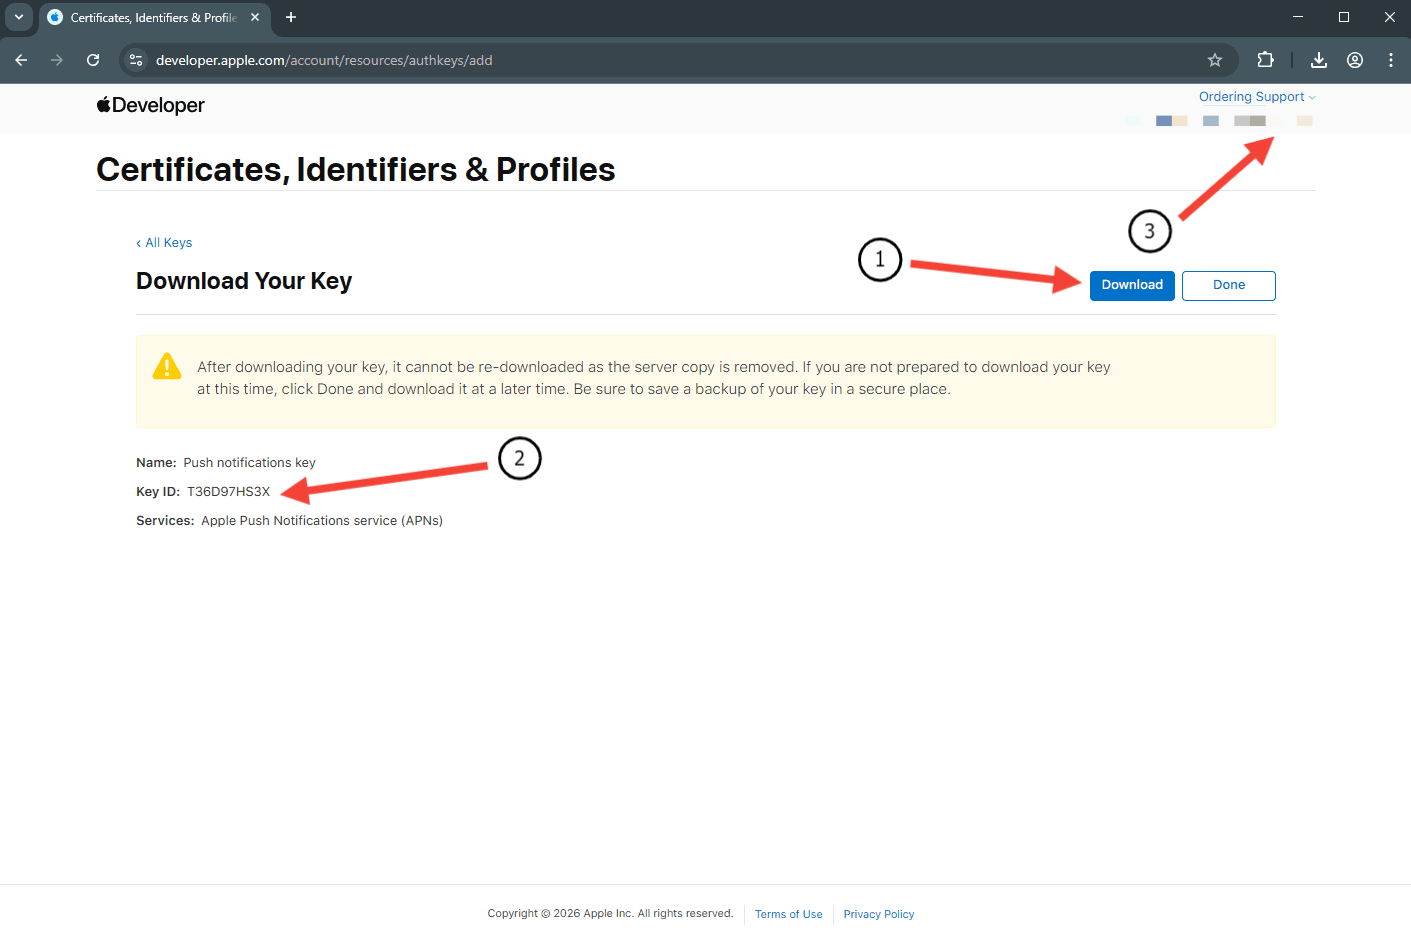
6. Download the **.p8 key file** and save it. Also copy **Key ID (2)** and **Team ID (3)**.
[](https://docs.ordering.co/assets/files/df00424fda06378fd1329ce2-ed96c7e202ce104a0bfacf31802bb234.png)
Apple shows the .p8 file once. Keep it private.
### Part 2: OneSignal config
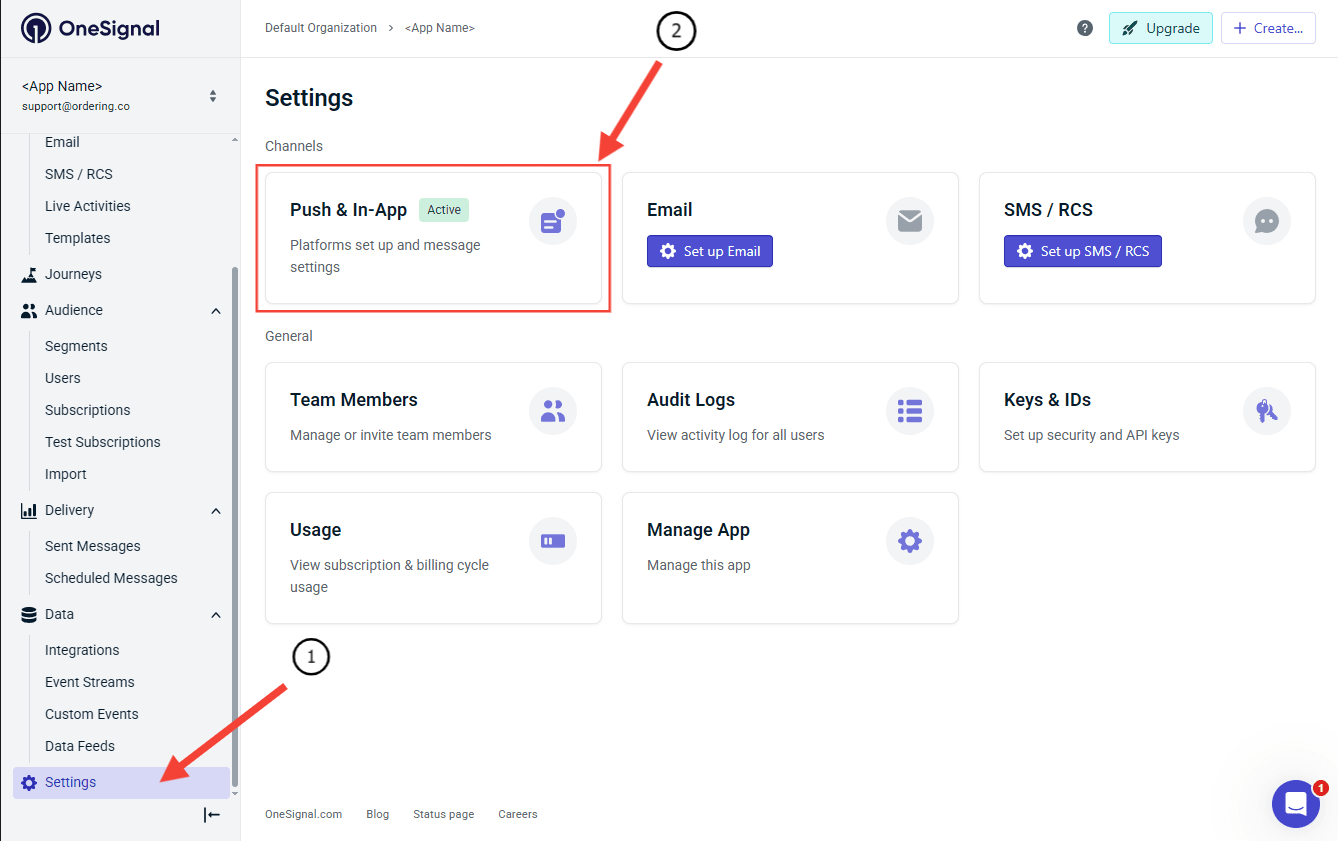
1. Sign in to OneSignal, open **Settings**, and select **Push & In-App Settings**.
[](https://docs.ordering.co/assets/files/c9e51f42c36d2586efa32ec3-061f4d82fb028b7a946e61f973734beb.png)
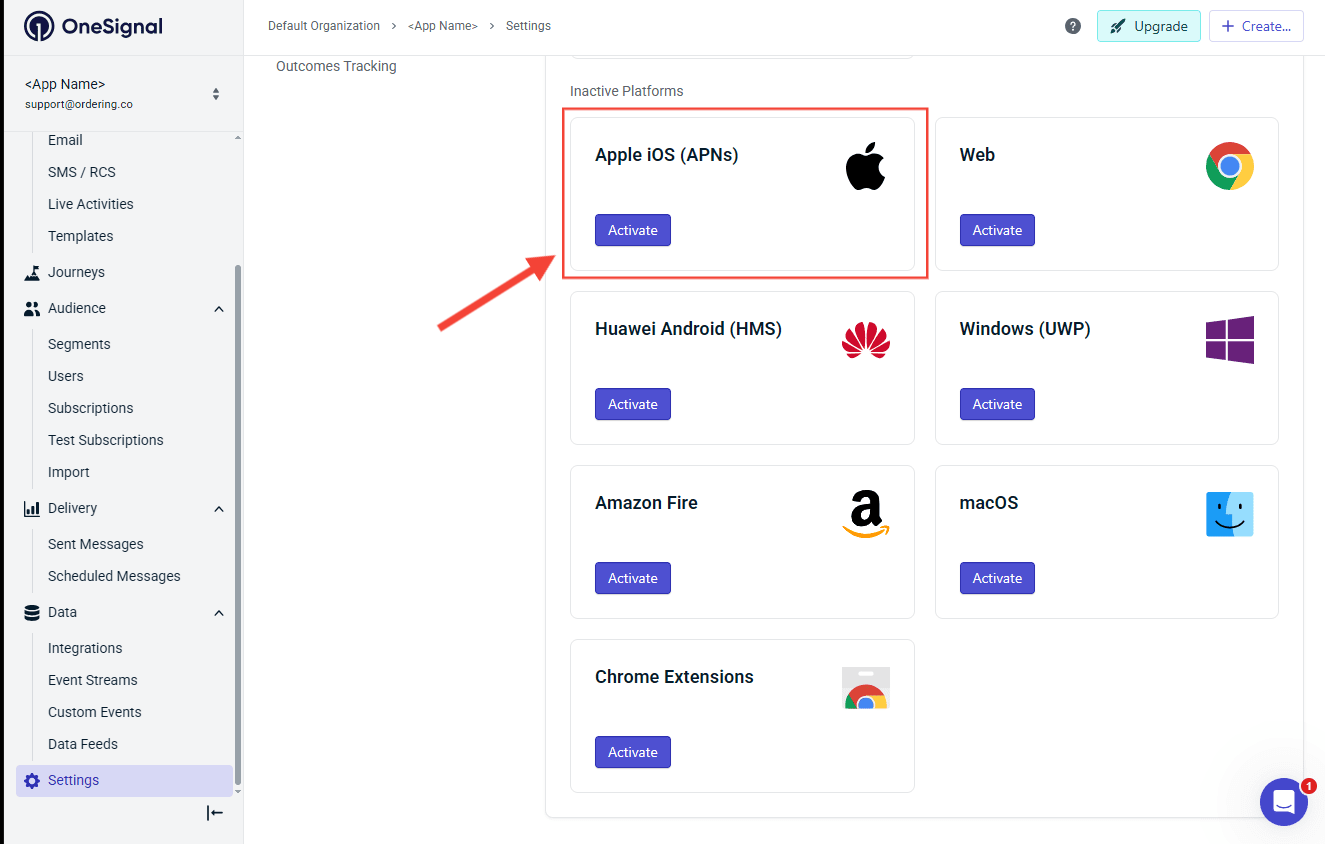
2. Select **Apple iOS (APNs)** and **Activate**.
[](https://docs.ordering.co/assets/files/b6a336b197f1c49eecf56332-36125ce44d8fdd631109652f215b2501.png)
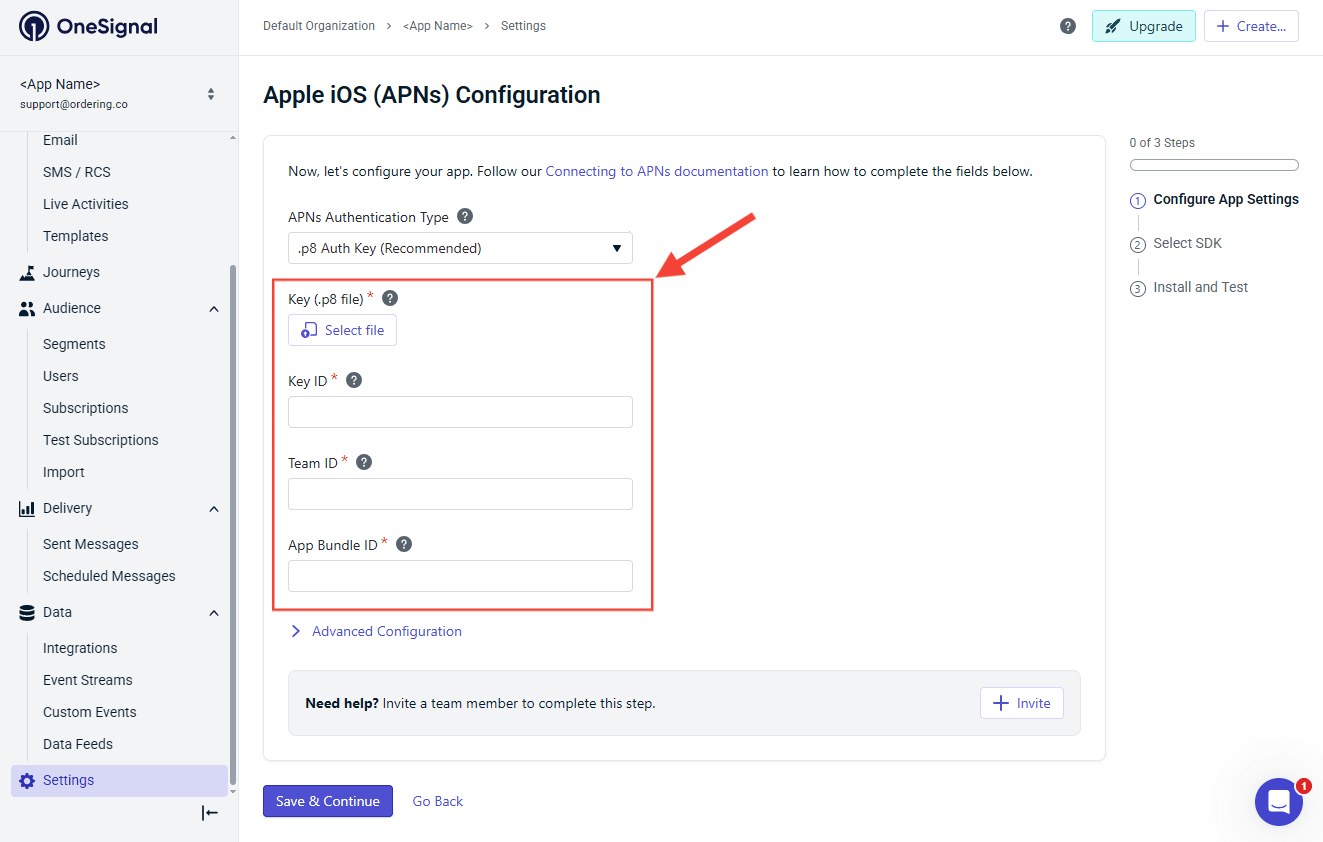
3. Enter the **.p8 key file**, **Key ID**, **Team ID**, and **App Bundle ID**.
[](https://docs.ordering.co/assets/files/2318bb9ee296bc24d73f183c-ffb3bcf85fea02c03f918b25e153d001.png)
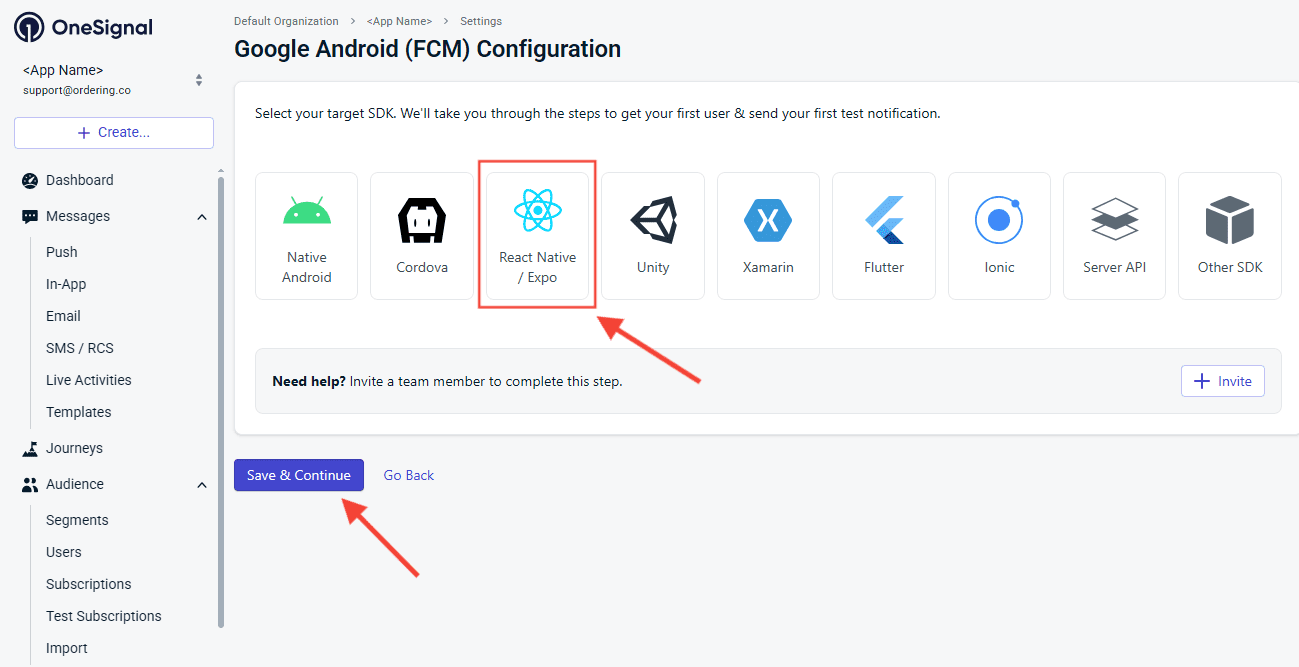
4. Select your target SDK as **React Native**.
[](https://docs.ordering.co/assets/files/75c1c373f65d62102787c0dc-1546c99ca5cca88426cc9daf53f46843.png)
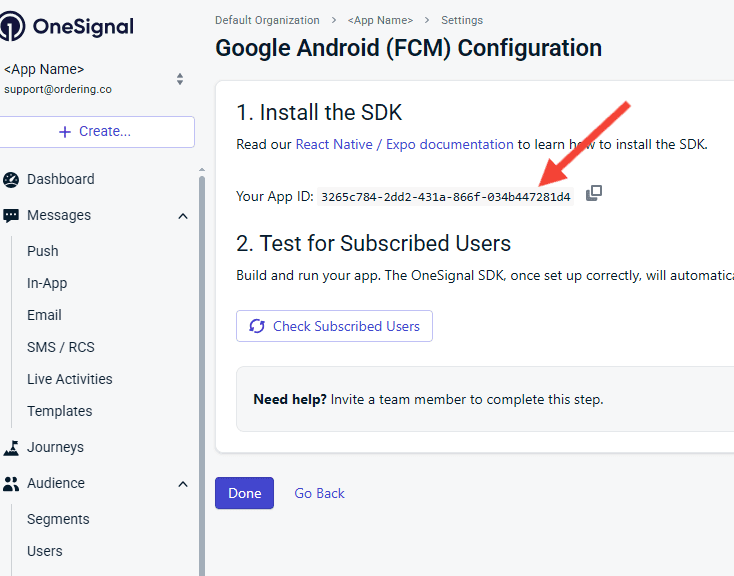
5. You do not need to copy a new OneSignal App ID. The ID you added for Android is the same for this app.
[](https://docs.ordering.co/assets/files/e67fb21064d78834f1d74e0a-6fd83f308f449449abd20eeac95efef3.png)
6. iOS (Apple) notifications are now configured for this OneSignal app. Confirm delivery on a test device; the save in OneSignal is not a push to a customer.
### OneSignal: Keys and IDs (iOS)
See [Keys and IDs](https://documentation.onesignal.com/docs/en/keys-and-ids).
Repeat the OneSignal registration steps for each of your iOS applications. You can reuse the same .p8 key file to configure notifications in OneSignal for each app.
## Testing push notifications
After completing the configuration:
1. Install the app on a **test device**.
2. Open the app and **allow notifications**.
3. Perform an action that triggers a notification (for example, place a test order).
If the configuration is correct, the notification should be received on that device. A missed notification is not proof that every later order will alert every user.
## Best practices
- Keep messages **short and clear**.
- Avoid sending **too many notifications**.
- Send notifications only when they provide **useful information**.
- Use notifications for **important updates and promotions**.
## Troubleshooting
### Notifications are not received
Check the following:
- The **OneSignal App ID** is correct
- The **REST API Key** is correct
- The user **enabled notifications on their device**
- The device has an **active internet connection**
- The app is properly registered in **OneSignal**
- In **OneSignal apps**, the **App ID** and **REST API key** match the app and environment you are testing.
## Dashboard configuration
Follow [Push notifications](https://docs.ordering.co/docs/products/dashboard/settings/pro/push-notifications/) to enter the credentials for the matching app and save. Verify delivery separately with a synthetic event and a registered test device. Dashboard visual order alerts are configured in their own block in the same section.
[Back to the main guide](https://docs.ordering.co/docs/products/dashboard/settings/pro/push-notifications/)